冰河技术
导读
♻学习路线
  • 面试必问系列

    • 面试必问
  • 架构与模式

    • Java极简设计模式
    • 实战高并发设计模式
  • Java核心技术

    • Java8新特性
    • IOC核心技术
    • JVM调优技术
  • 容器化核心技术

    • Dockek核心技术
  • 分布式存储

    • Mycat核心技术
  • 数据库核心技术

    • MySQL基础篇
  • 服务器核心技术

    • Nginx核心技术
  • 渗透核心技术

    • 渗透实战技术
  • 底层技术
  • 源码分析
  • 基础案例
  • 实战案例
  • 面试
  • 系统架构
  • Spring6核心技术
  • 分布式事务

    • 分布式事务系列视频
  • SpringBoot
  • SpringCloudAlibaba
  • 🔥AI大模型项目

    • 一站式AI智能平台
    • AI智能客服系统
    • AI智能问答系统
    • 实战AI大模型
  • 中间件项目

    • 手写高性能Redis组件
    • 手写高性能脱敏组件
    • 手写线程池项目
    • 手写高性能SQL引擎
    • 手写高性能Polaris网关
    • 手写高性能RPC项目
  • 高并发项目

    • 分布式IM即时通讯系统(新)
    • 分布式Seckill秒杀系统
    • 实战高并发设计模式
  • 微服务项目

    • 简易电商脚手架项目
  • 手撕源码

    • 手撕Spring6源码
🌍知识星球
  • 总览

    • 《书籍汇总》
  • 出版图书

    • 《深入理解高并发编程:核心原理与案例实战》
    • 《深入理解高并发编程:JDK核心技术》
    • 《深入高平行開發:深度原理&專案實戰》
    • 《深入理解分布式事务:原理与实战》
    • 《MySQL技术大全:开发、优化与运维实战》
    • 《海量数据处理与大数据技术实战》
  • 电子书籍

    • 《实战高并发设计模式》
    • 《深入理解高并发编程(第2版)》
    • 《深入理解高并发编程(第1版)》
    • 《从零开始手写RPC框架(基础篇)》
    • 《SpringCloud Alibaba实战》
    • 《冰河的渗透实战笔记》
    • 《MySQL核心知识手册》
    • 《Spring IOC核心技术》
  • 关于自己
  • 关于学习
  • 关于职场
B站
Github
  • 专栏介绍

    • 第00章:开篇:我要带你一步步调试Spring6.0源码啦!
  • 第一篇:IOC容器

    • 第01章:深度解析@Configuration注解
    • 第02章:深度解析@ComponentScan注解
    • 第03章:深度解析@Bean注解
    • 第04章:深度解析从IOC容器中获取Bean的过程
    • 第05章:深度解析@Import注解
    • 第06章:深度解析@PropertySource注解
    • 第07章:深度解析@DependsOn注解
    • 第08章:深度解析@Conditional注解
    • 第09章:深度解析@Lazy注解
    • 【付费】 第10章:深度解析@Component注解(含@Repository、@Service和@Controller)
    • 【付费】 第11章:深度解析@Value注解
    • 【付费】 第12章:深度解析@Autowired注解
    • 【付费】 第13章:深度解析@Qualifier注解
    • 【付费】 第14章:深度解析@Resource注解
    • 【付费】 第15章:深度解析@Inject注解
    • 【付费】 第16章:深度解析@Primary注解
    • 【付费】 第17章:深度解析@Scope注解
    • 【付费】 第18章:深度解析@PostConstruct注解与@PreDestroy注解
    • 【付费】 第19章:深度解析@Profile注解
    • 【付费】第20章:深度解析循环依赖(史上最全)
    • 【付费】第21章:深度解析事件监听机制
  • 第二篇:AOP切面

    • 【付费】第22章:AOP切面型注解实战
    • 【付费】第23章:深度解析@EnableAspectJAutoProxy注解
    • 【付费】第24章:深度解析切入点表达式
    • 【付费】第25章:深度解析构建AOP拦截器链的流程
    • 【付费】第26章:深度解析调用通知方法的流程
    • 【付费】第27章:深度解析@DeclareParents注解
    • 【付费】第28章:@EnableLoadTimeWeaving注解
  • 第三篇:声明式事务

    • 【付费】第29章:Spring事务概述与编程实战
    • 【付费】第30章:深度解析Spring事务三大接口
    • 【付费】第31章:深度解析Spring事务隔离级别与传播机制
    • 【付费】第32章:深度解析@EnableTransactionManagement注解
    • 【付费】第33章:深度解析@Transactional注解
    • 【付费】第34章:深度解析Spring事务的执行流程
    • 【付费】第35章:深度解析Spring底层事务传播机制源码
    • 【付费】第36章:深度解析@TransactionEventListener注解
    • 【付费】第37章:七大场景深度分析Spring事务嵌套最佳实践
    • 【付费】第38章:深度解析Spring事务失效的八大场景
  • 第四篇:AOT预编译

    • 第39章:AOT预编译技术概述
    • 【付费】第40章:手动构建Native Image
    • 【付费】第41章:Maven构建Native Image
  • 第五篇:SpringMVC

    • 【付费】第42章:注解型SpringMVC通用SpringBoot启动模型设计与实现
    • 【付费】第43章:深度解析@Controller注解
    • 【付费】第44章:深度解析@RestController注解
    • 【付费】第45章:深度解析@RequestMapping注解
    • 【付费】第46章:深度解析@RequestParam注解
    • 【付费】第47章:深度解析@PathVariable注解
    • 【付费】第48章:深度解析@RequestBody注解
    • 【付费】第49章:深度解析@RequestHeader注解
    • 【付费】第50章:深度解析@CookieValue注解
    • 【付费】第51章:深度解析@ModelAttribute注解
    • 【付费】第52章:深度解析@ExceptionHandler注解
    • 【付费】第53章:深度解析@InitBinder注解
    • 【付费】第54章:深度解析@ControllerAdvice注解
    • 【付费】第55章:深度解析@RequestAttribute注解
    • 【付费】第56章:深度解析@SessionAttribute注解
    • 【付费】第57章:深度解析@SessionAttributes注解
    • 【付费】第58章:深度解析@ResponseBody注解
    • 【付费】第59章:深度解析@CrossOrigin注解
  • 作业篇

    • 作业:专栏整体作业

《Spring核心技术》第12章-注入数据型注解:深度解析@Autowired注解

作者:冰河
星球:http://m6z.cn/6aeFbs
博客:https://binghe.site
文章汇总:https://binghe.site/md/all/all.html
源码地址:https://github.com/binghe001/spring-annotation-book/tree/master/spring-annotation-chapter-12

沉淀,成长,突破,帮助他人,成就自我。

大家好,我是冰河~~


  • 本章难度:★★★★☆

  • 本章重点:进一步学习并掌握@Autowired注解向Bean中注入值的案例和流程,从源码级别彻底掌握@Autowired注解在Spring底层的执行流程。


本节目录如下所示:

  • 学习指引
  • 注解说明
    • 注解源码
    • 使用场景
  • 使用案例
  • 源码时序图
  • 源码解析
  • 总结
  • 思考
  • VIP服务

一、学习指引

Spring中的@Autowired注解,你真的彻底了解过吗?

@Autowired注解可以说是Spring当中使用的非常频繁的一个注解,我们自己写的类如果需要注入IOC容器,就可以使用@Autowired注解进行注入。本章,就简单介绍下@Autowired注解。

二、注解说明

关于@Autowired注解的一点点说明~~

@Autowired注解能够自动按照类型注入。当IOC容器中有且仅有一个类型匹配时,使用@Autowired注解可以直接注入成功。当超过一个类型匹配时,则使用变量名称(写在方法上就是方法名称)作为Bean的id,在符合类型的多个Bean中再次进行匹配,如果能匹配上就可以注入成功。如果匹配不上,是否报错要看required属性的取值。

2.1 注解源码

@Autowired注解的源码详见:org.springframework.beans.factory.annotation.Autowired。

/**
 * @author Juergen Hoeller
 * @author Mark Fisher
 * @author Sam Brannen
 * @since 2.5
 * @see AutowiredAnnotationBeanPostProcessor
 * @see Qualifier
 * @see Value
 */
@Target({ElementType.CONSTRUCTOR, ElementType.METHOD, ElementType.PARAMETER, ElementType.FIELD, ElementType.ANNOTATION_TYPE})
@Retention(RetentionPolicy.RUNTIME)
@Documented
public @interface Autowired {
	boolean required() default true;
}

从源码可以看出,@Autowired注解是从Spring 2.5版本开始提供的注解,可以标注到构造方法、方法、参数、字段和其他注解上。在@Autowired注解中,只提供了一个boolean类型的required属性。具体含义如下所示。

  • required:表示是否必须注入成功,取值为true或false。默认值是true,表示必须注入成功。当取值为true时,注入不成功会报错,否则,注入不成功不会报错。

2.2 使用场景

在实际开发中@Autowired注解的应用非常广泛。在开发过程中,将我们自己写的类注入到另一个类的字段、方法参数、方法、构造方法时,就可以使用@Autowired注解。

三、使用案例

@Autowired的实现案例,我们一起实现吧~~

本节,就基于@Autowired注解实现向Bean属性中赋值的案例,具体的实现步骤如下所示。

(1)新增AutowiredDao类

AutowiredDao的源码详见:spring-annotation-chapter-12工程下的io.binghe.spring.annotation.chapter12.dao.AutowiredDao。

@Repository
public class AutowiredDao {
}

可以看到,AutowiredDao类模拟的是dao层的代码,在类上标注了@Repository注解。

(2)新增AutowiredService类

AutowiredService类的源码详见:spring-annotation-chapter-12工程下的io.binghe.spring.annotation.chapter12.service.AutowiredService。

@Service
public class AutowiredService {
    @Autowired
    private AutowiredDao autowiredDao;
    @Override
    public String toString() {
        return "AutowiredService{" +
                "autowiredDao=" + autowiredDao +
                '}';
    }
}

可以看到,AutowiredService类模拟的是service层的代码,并且在类上标注了@Service注解。在AutowiredService类中,使用@Autowired注解注入了AutowiredDao类的Bean对象。

(3)新增AutowiredConfig类

AutowiredConfig类的源码详见:spring-annotation-chapter-12工程下的io.binghe.spring.annotation.chapter12.config.AutowiredConfig。

@Configuration
@ComponentScan(value = {"io.binghe.spring.annotation.chapter12"})
public class AutowiredConfig {
}

可以看到,AutowiredConfig类表示Spring的配置类,在AutowiredConfig类上标注了@Configuration注解,并且使用@ComponentScan注解指定了扫描的基础包名为io.binghe.spring.annotation.chapter12。

(4)新增AutowiredTest类

AutowiredTest类的源码详见:spring-annotation-chapter-12工程下的io.binghe.spring.annotation.chapter12.AutowiredTest。

public class AutowiredTest {
    public static void main(String[] args) {
        AnnotationConfigApplicationContext context = new AnnotationConfigApplicationContext(AutowiredConfig.class);
        AutowiredDao autowiredDao = context.getBean(AutowiredDao.class);
        System.out.println("autowiredDao===>>>" + autowiredDao);
        AutowiredService autowiredService = context.getBean(AutowiredService.class);
        System.out.println("autowiredService=>>>" + autowiredService);
    }
}

可以看到,在AutowiredTest类的main()方法中,会从IOC容器中获取AutowiredDao类的Bean对象并打印,并且从IOC容器中获取AutowiredService类的Bean对象并打印。

(5)运行AutowiredTest类

运行AutowiredTest类的main()方法,输出的结果信息如下所示。

autowiredDao===>>>io.binghe.spring.annotation.chapter12.dao.AutowiredDao@1ba9117e
autowiredService=>>>AutowiredService{autowiredDao=io.binghe.spring.annotation.chapter12.dao.AutowiredDao@1ba9117e}

可以看到,打印了从IOC容器中获取到的AutowiredDao类的Bean对象和AutowiredService类的Bean对象,并且向AutowiredService类中注入的AutowiredDao类的Bean对象和直接从IOC容器中获取的AutowiredDao类的Bean对象是同一个对象。

四、源码时序图

结合时序图理解源码会事半功倍,你觉得呢?

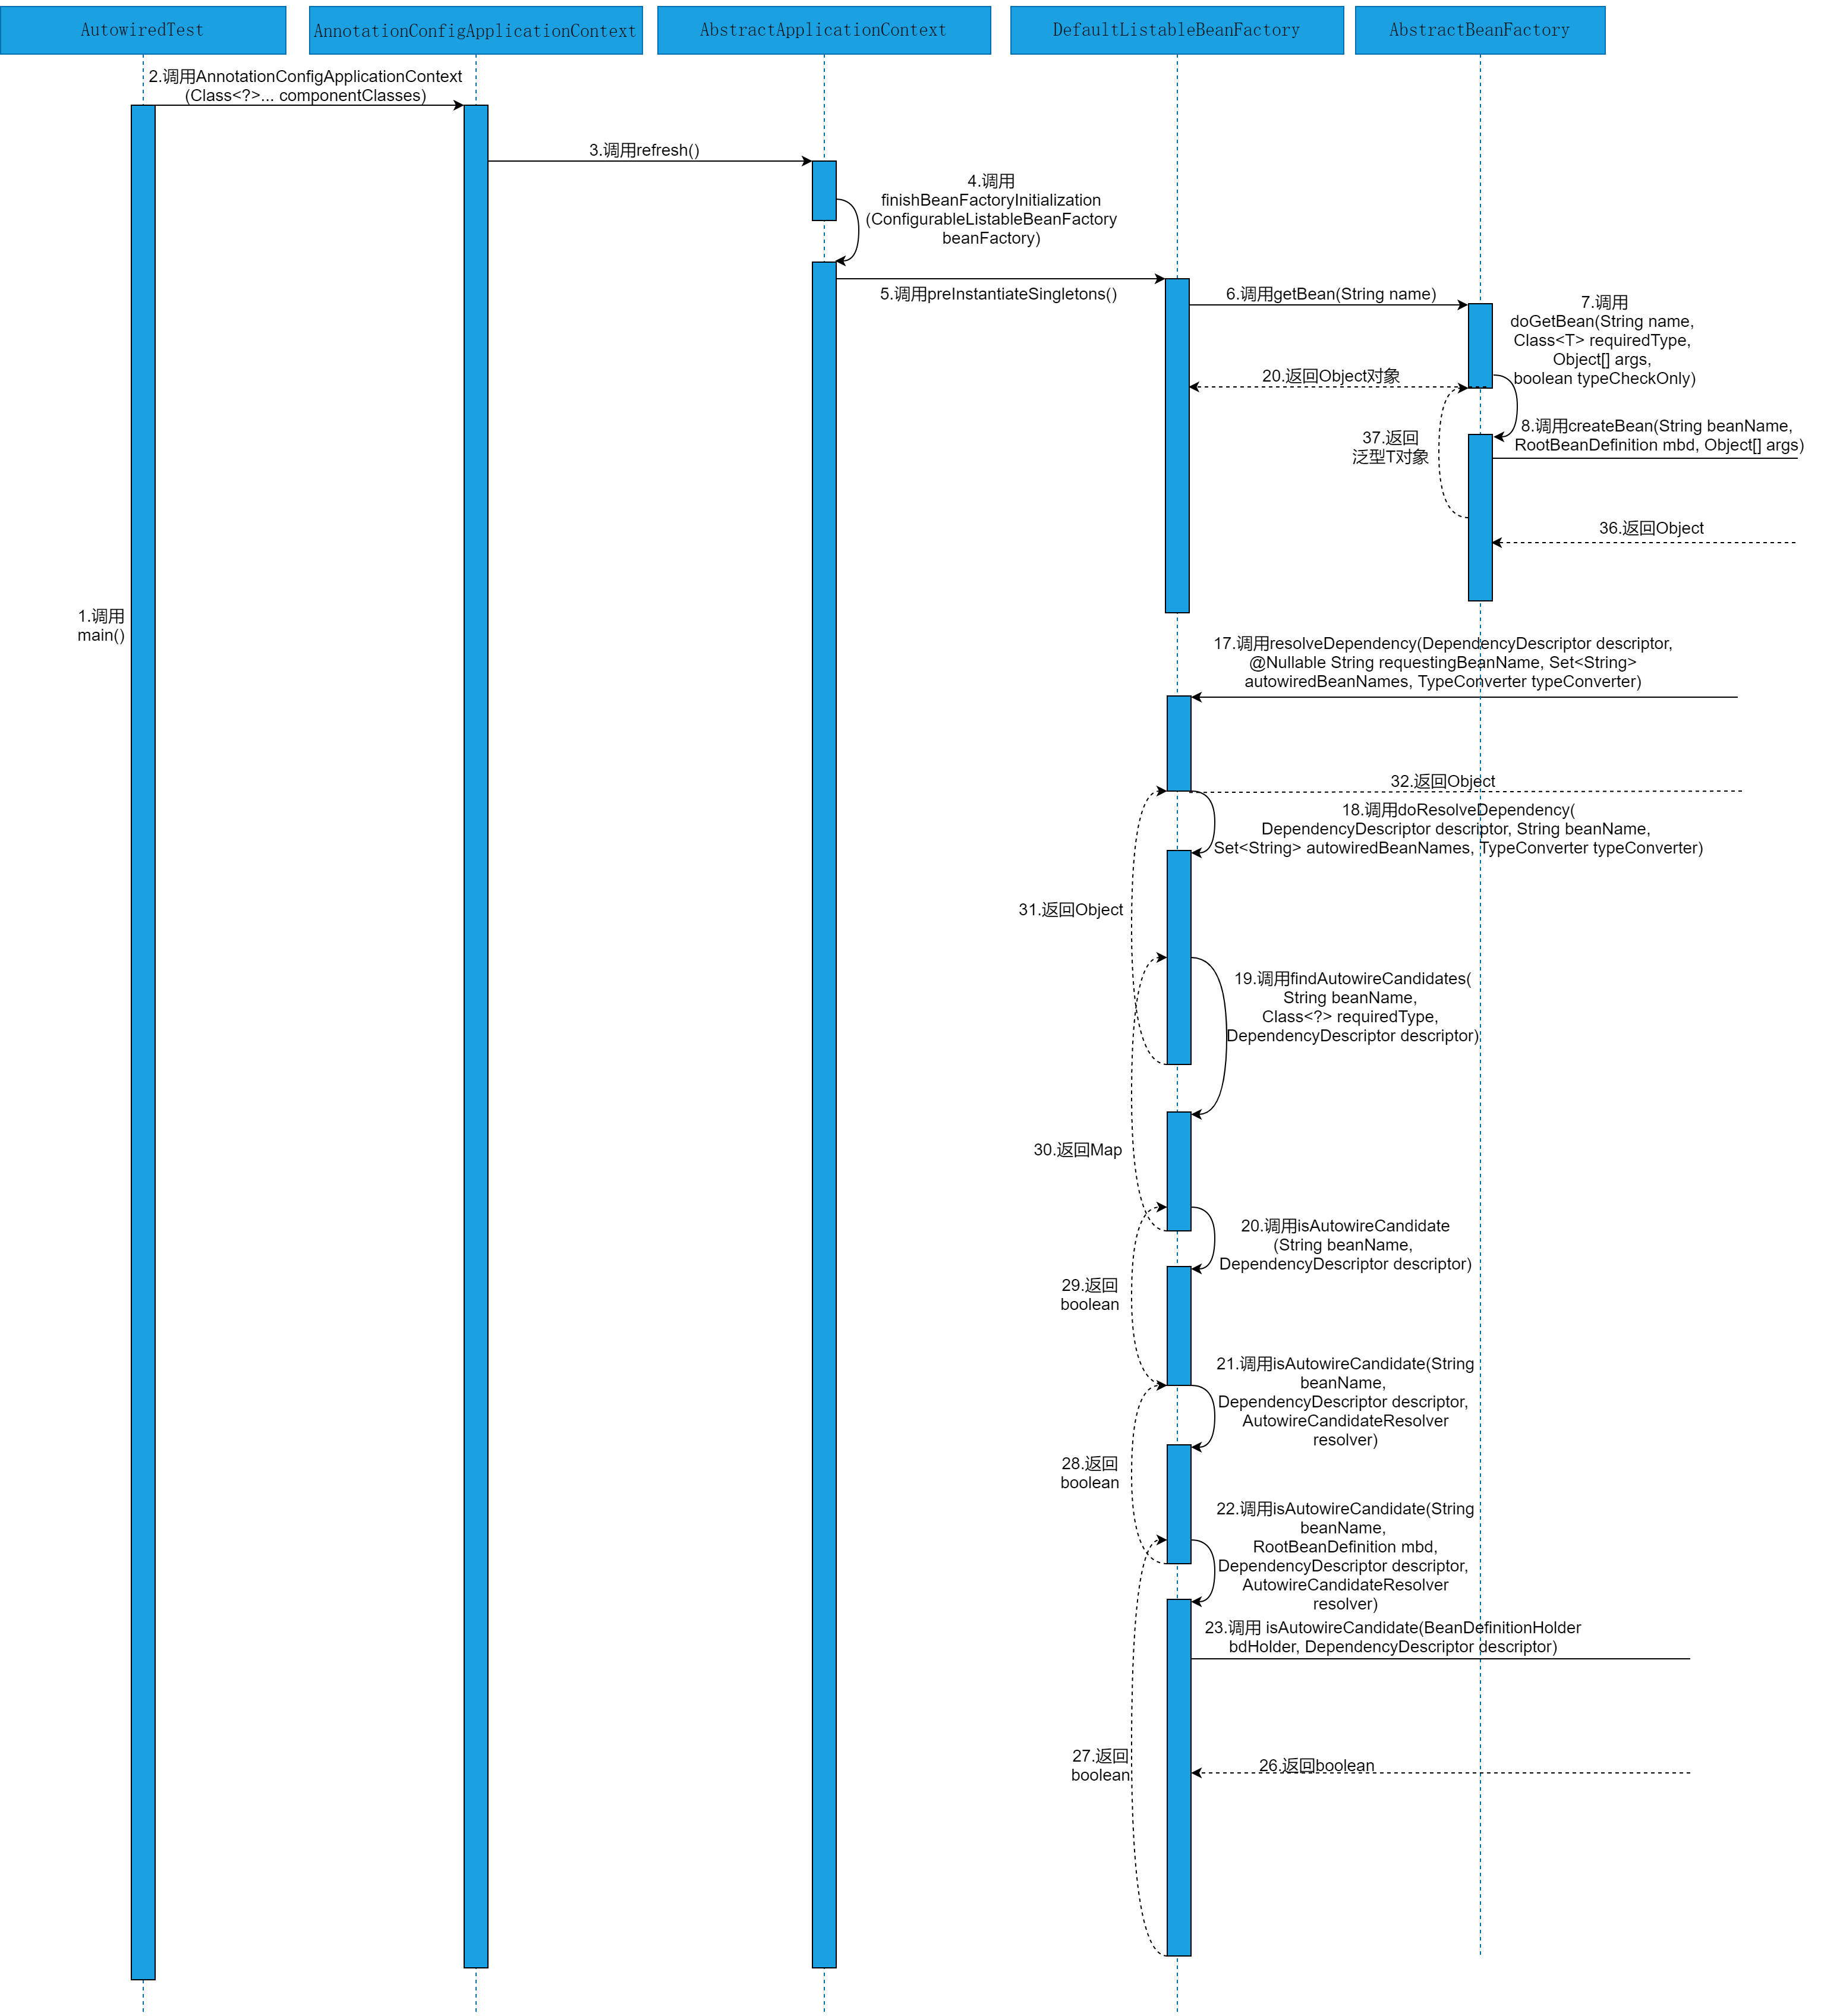
注意:本章也可以从解析并获取 @Autowired修饰的属性、为 @Autowired修饰属性赋值和使用@Autowired获取属性值三个方面分析源码时序图。获取 @Autowired修饰的属性、为 @Autowired修饰属性赋值的源码时序图基本与@Value注解相同,使用@Autowired注解获取属性值的源码时序图略有差异。使用@Autowired注解获取属性值的源码时序图如图12-1~12-2所示。

图12-1

查看完整文章

加入冰河技术知识星球,解锁完整技术文章与完整代码

在 GitHub 上编辑此页
上次更新: 2026/4/29 16:18
Contributors: binghe001
Prev
【付费】 第11章:深度解析@Value注解
Next
【付费】 第13章:深度解析@Qualifier注解
阅读全文
×

扫码或搜索:冰河技术
发送:290992
即可立即永久解锁本站全部文章

星球会员
跳转链接