# 《Spring核心技术》第10章-创建对象型注解:深度解析@Component注解(含@Repository、@Service和@Controller)
作者:冰河
星球:http://m6z.cn/6aeFbs (opens new window)
博客:https://binghe.gitcode.host (opens new window)
文章汇总:https://binghe.gitcode.host/md/all/all.html (opens new window)
源码地址:https://github.com/binghe001/spring-annotation-book/tree/master/spring-annotation-chapter-10 (opens new window)
沉淀,成长,突破,帮助他人,成就自我。
大家好,我是冰河~~
本章难度:★★★★☆
本章重点:进一步学习并掌握@Component注解向IOC容器中注入Bean的案例和流程,从源码级别彻底掌握@Component注解在Spring底层的执行流程。
本节目录如下所示:
- 学习指引
- 注解说明
- 注解源码
- 使用场景
- 使用案例
- 源码时序图
- 源码解析
- 总结
- 思考
- VIP服务
# 一、学习指引
Spring中的@Component注解,你真的彻底了解过吗?
@Component注解可以说是Spring中使用的比较频繁的一个注解了。在项目开发过程中,我们自己编写的类如果想注入到Spring中,由Spring来管理Bean的生命周期,就可以使用@Component注解将其注入到IOC容器中。并且@Component注解还有三个衍生注解,那就是@Repository、@Service和@Controller注解,并且衍生出的注解通常会在使用MVC架构开发项目时,标注到MVC架构的分层类上。比如:@Repository通常会被标注到表示dao层的类上,@Service注解通常会被标注到表示Service层的类上,而@Controller注解通常会被标注到表示Controller层的类上。
# 二、注解说明
关于@Component注解的一点点说明~~
使用Spring开发项目时,如果类上标注了@Component注解,当启动IOC容器时,Spring扫描到标注了@Component注解的单例Bean,就会创建对应的Bean对象并注入到IOC容器中。
# 2.1 注解源码
IOC容器在启动时,如果扫描到被标注了@Component注解的类,则会将这些类的类定义信息自动注入IOC容器,并创建这些类的对象。
@Component注解的源码详见:org.springframework.stereotype.Component。
/**
 * @author Mark Fisher
 * @since 2.5
 * @see Repository
 * @see Service
 * @see Controller
 */
@Target(ElementType.TYPE)
@Retention(RetentionPolicy.RUNTIME)
@Documented
@Indexed
public @interface Component {
	String value() default "";
}
2
3
4
5
6
7
8
9
10
11
12
13
14
从源码可以看出,@Component注解是从Spring2.5版本开始提供的注解,并且@Component注解只能标注到类上。其中只含有一个String类型的value属性,具体含义如下所示。
- value:用于指定注入容器时Bean的id。如果没有指定Bean的id,默认值为当前类的名称。
@Component注解提供了三个衍生注解:分别是:@Repository、@Service和@Controller注解。
(1)@Repository注解
@Repository注解的源码详见:org.springframework.stereotype.Repository。
/**
 * @author Rod Johnson
 * @author Juergen Hoeller
 * @since 2.0
 * @see Component
 * @see Service
 */
@Target(ElementType.TYPE)
@Retention(RetentionPolicy.RUNTIME)
@Documented
@Component
public @interface Repository {
	@AliasFor(annotation = Component.class)
	String value() default "";
}
2
3
4
5
6
7
8
9
10
11
12
13
14
15
(2)@Service注解
@Service注解的源码详见:org.springframework.stereotype.Service。
/**
 * @author Juergen Hoeller
 * @since 2.5
 * @see Component
 * @see Repository
 */
@Target(ElementType.TYPE)
@Retention(RetentionPolicy.RUNTIME)
@Documented
@Component
public @interface Service {
	@AliasFor(annotation = Component.class)
	String value() default "";

}
2
3
4
5
6
7
8
9
10
11
12
13
14
15
(3)@Controller注解
@Controller注解注解的源码详见:org.springframework.stereotype.Controller。
/**
 * @author Arjen Poutsma
 * @author Juergen Hoeller
 * @since 2.5
 * @see Component
 * @see org.springframework.web.bind.annotation.RequestMapping
 * @see org.springframework.context.annotation.ClassPathBeanDefinitionScanner
 */
@Target(ElementType.TYPE)
@Retention(RetentionPolicy.RUNTIME)
@Documented
@Component
public @interface Controller {
	@AliasFor(annotation = Component.class)
	String value() default "";
}
2
3
4
5
6
7
8
9
10
11
12
13
14
15
16
可以看到,@Repository、@Service和@Controller注解本质上还是@Component注解,这里不再赘述。
# 2.2 使用场景
在Spring开发项目的过程中,如果需要将自己创建的类注入到IOC容器中,就可以使用@Component注解,也可以使用@Repository、@Service和@Controller注解。其中,@Component注解一般会被标注到非三层(非MVC架构)类上,而@Repository、@Service和@Controller注解通常会被标注到三层架构的类上。并且@Repository通常会被标注到表示dao层的类上,@Service注解通常会被标注到表示Service层的类上,而@Controller注解通常会被标注到表示Controller层的类上。
这里,需要注意的是,基于Spring的注解开发项目时,必须先将类对象交给Spring管理,然后Spring会处理类中的属性和方法。如果类没有被Spring接管,那么类里面的属性和方法上的注解都不会被解析。
# 三、使用案例
@Component的实现案例,我们一起实现吧~~
本节,就基于@Component注解、@Repository、@Service和@Controller注解实现简单的案例程序,观察被上述四个注解标注的类是否注入到IOC容器中。具体实现步骤如下所示。
(1)新建ComponentBean类
ComponentBean类的源码详见:spring-annotation-chapter-10工程下的io.binghe.spring.annotation.chapter10.component.ComponentBean。
@Component
public class ComponentBean {
}
2
3
可以看到,ComponentBean就是一个标注了@Component注解的普通类。
(2)新建RepositoryBean类
RepositoryBean类的源码详见:spring-annotation-chapter-10工程下的io.binghe.spring.annotation.chapter10.component.RepositoryBean。
@Repository
public class RepositoryBean {
}
2
3
可以看到,RepositoryBean类就是一个标注了@Repository注解的普通类。
(3)新建ServiceBean类
ServiceBean类的源码详见:spring-annotation-chapter-10工程下的io.binghe.spring.annotation.chapter10.component.ServiceBean。
@Service
public class ServiceBean {
}
2
3
可以看到,ServiceBean类就是一个标注了@Service注解的普通类。
(4)新建ControllerBean类
ControllerBean类的源码详见:spring-annotation-chapter-10工程下的io.binghe.spring.annotation.chapter10.component.ControllerBean。
@Controller
public class ControllerBean {
}
2
3
可以看到,ControllerBean类就是一个标注了@Controller注解的普通类。
(5)新建ComponentConfig类
ComponentConfig类的源码详见:spring-annotation-chapter-10工程下的io.binghe.spring.annotation.chapter10.config.ComponentConfig。
@Configuration
@ComponentScan(value = {"io.binghe.spring.annotation.chapter10"})
public class ComponentConfig {
}
2
3
4
可以看到,ComponentConfig类上标注了@Configuration,说明ComponentConfig类是一个Spring的配置类,并且使用@ComponentScan注解指定了扫描的包名是io.binghe.spring.annotation.chapter10。
(6)新建ComponentTest类
ComponentTest类的源码详见:spring-annotation-chapter-10工程下的io.binghe.spring.annotation.chapter10.ComponentTest。
public class ComponentTest {
    public static void main(String[] args) {
        AnnotationConfigApplicationContext context = new AnnotationConfigApplicationContext(ComponentConfig.class);
        String[] definitionNames = context.getBeanDefinitionNames();
        Arrays.stream(definitionNames).forEach((definitionName) -> System.out.println(definitionName));
    }
}
2
3
4
5
6
7
可以看到,在ComponentTest类的main()方法中打印了IOC容器中注入的Bean对象的名称。
(7)运行ComponentTest类
运行ComponentTest类的main()方法,输出的结果信息如下所示。
org.springframework.context.annotation.internalConfigurationAnnotationProcessor
org.springframework.context.annotation.internalAutowiredAnnotationProcessor
org.springframework.context.event.internalEventListenerProcessor
org.springframework.context.event.internalEventListenerFactory
componentConfig
componentBean
controllerBean
repositoryBean
serviceBean
2
3
4
5
6
7
8
9
从输出的结果信息可以看出,打印出了被@Component、@Repository、@Service和@Controller注解标注的Bean的名称。
说明:使用Spring开发项目时,如果Spring扫描到类上标注了@Component、@Repository、@Service和@Controller注解的单例Bean,就会创建对应的Bean对象并注入到IOC容器中。
# 四、源码时序图
结合时序图理解源码会事半功倍,你觉得呢?
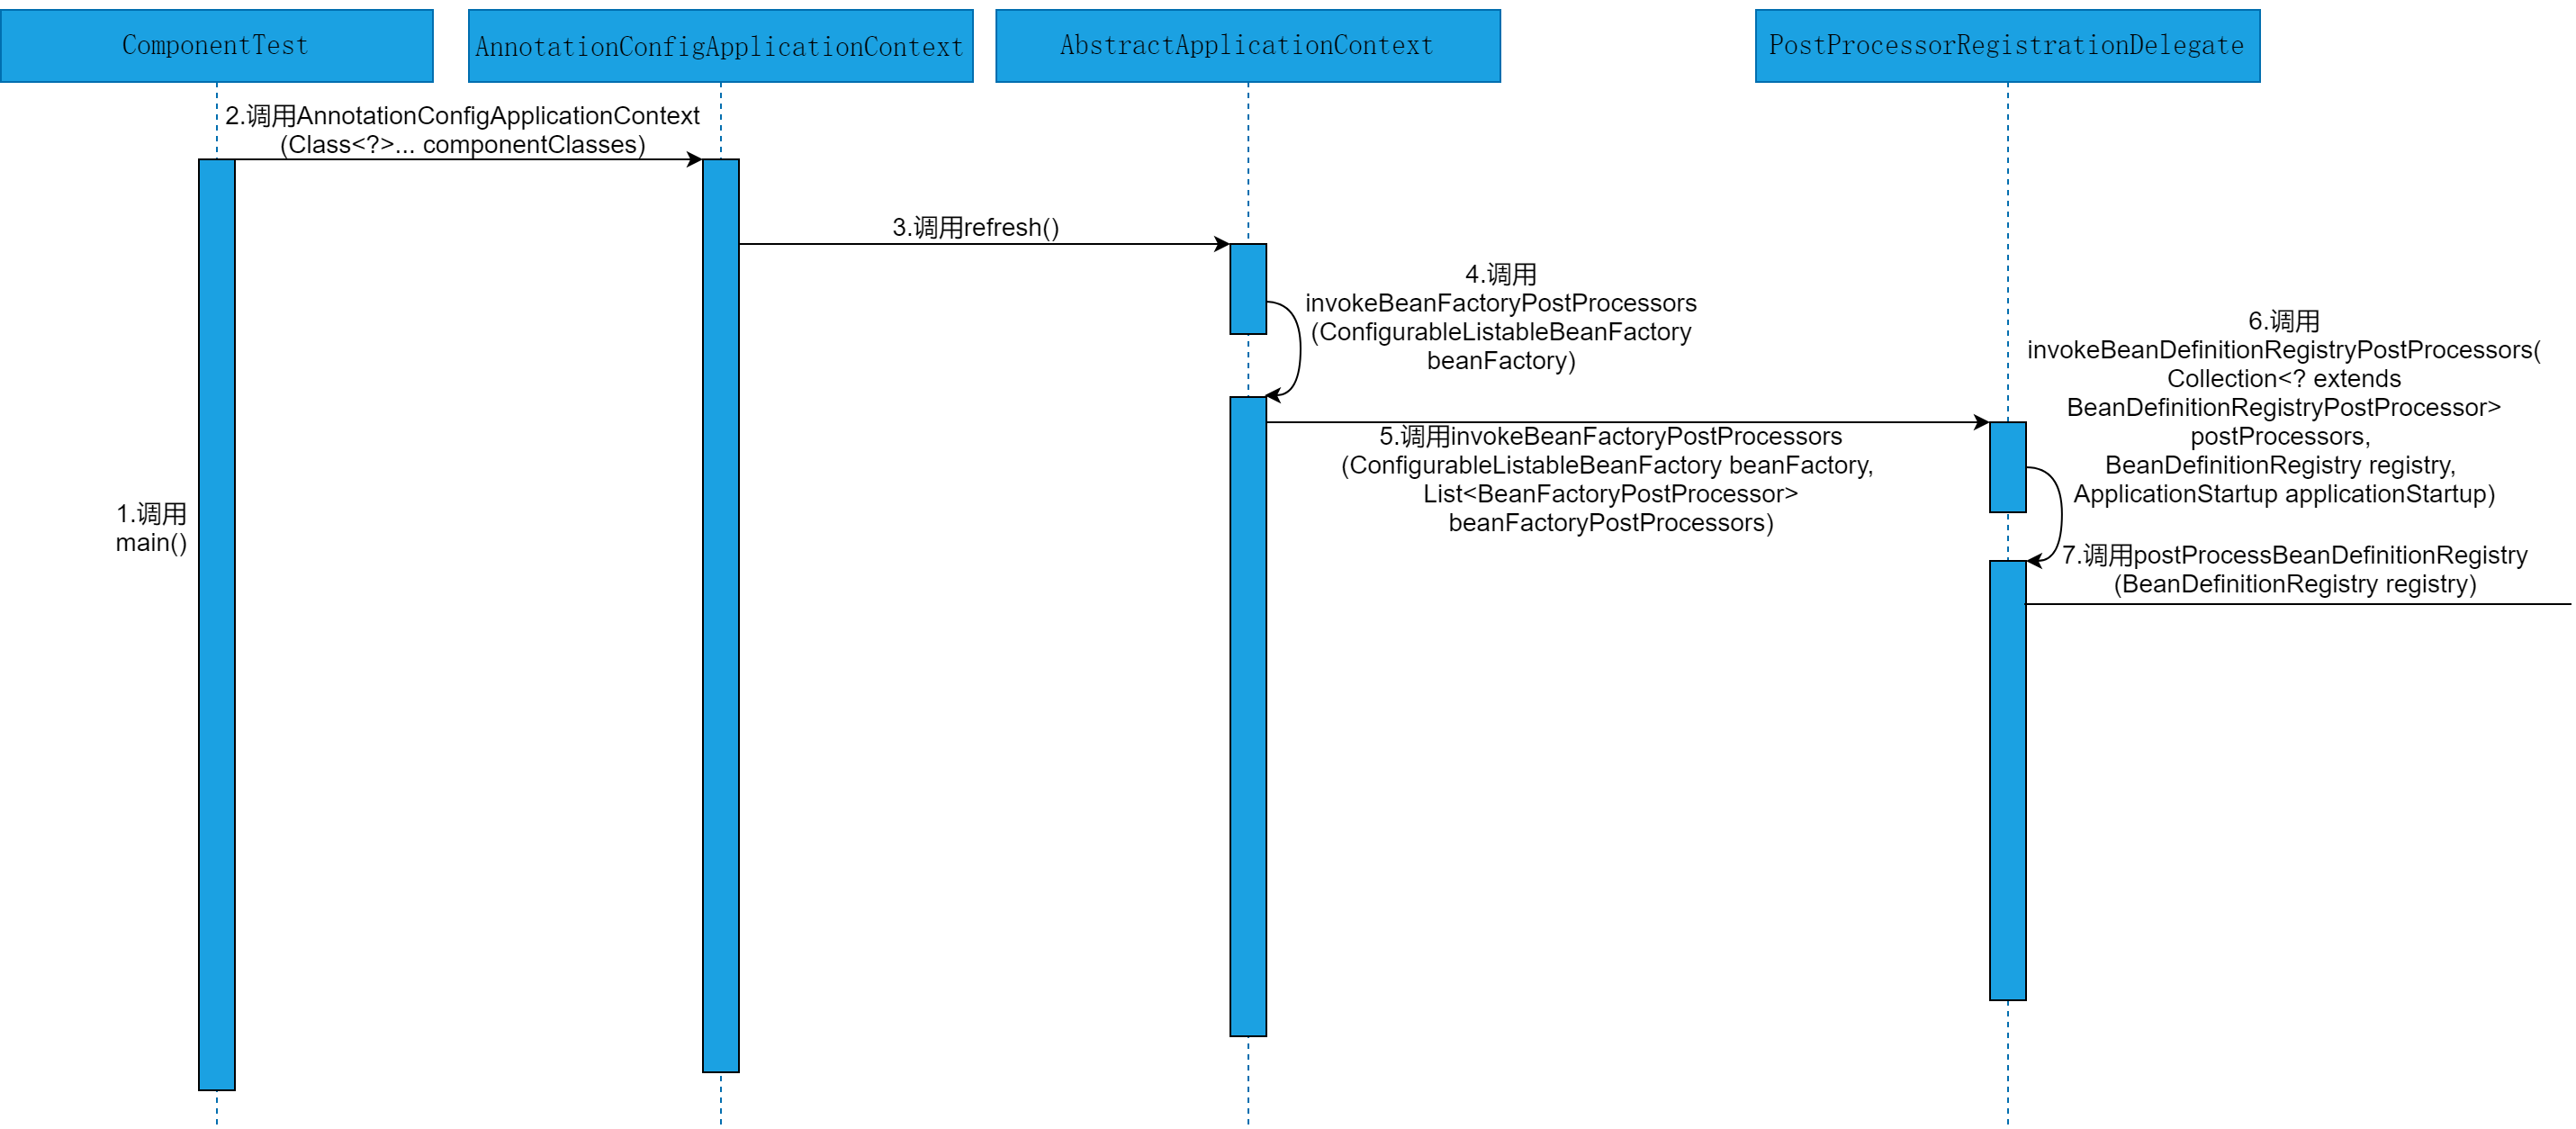
本节,就以源码时序图的方式,直观的感受下@Component注解在Spring源码层面的执行流程。@Component注解在Spring源码层面执行的时序图如图10-1~10~3所示。
注意:@Repository、@Service和@Controller注解本质上还是@Component注解,这里就不再单独分析@Repository、@Service和@Controller注解的执行流程。

# 查看完整文章
加入冰河技术 (opens new window)知识星球,解锁完整技术文章与完整代码
