# 《Spring核心技术》第21章:深度解析事件监听机制
作者:冰河
星球:http://m6z.cn/6aeFbs (opens new window)
博客:https://binghe.site (opens new window)
文章汇总:https://binghe.site/md/all/all.html (opens new window)
源码地址:https://github.com/binghe001/spring-annotation-book/tree/master/spring-annotation-chapter-21 (opens new window)
沉淀,成长,突破,帮助他人,成就自我。
大家好,我是冰河~~
本章难度:★★★★☆
本章重点:进一步学习并掌握Spring事件监听机制的案例和流程,从源码级别彻底掌握Spring事件监听机制的底层执行流程。
本章目录如下所示:
- 学习指引
- 事件监听机制
- 事件原理
- Spring内置事件
- 自定义事件
- 使用案例
- 同步事件监听机制案例
- 异步事件监听机制案例
- 源码时序图
- 基于接口实现
- 基于注解实现
- 源码解析
- 基础接口实现
- 基于注解实现
- 总结
- 思考
- VIP服务
# 一、学习指引
Spring中的事件监听机制,你真的彻底了解过吗?
Spring中提供了事件监听机制,能够非常方便的发布和接收事件,并且Spring中的事件监听机制使用了观察者模式,这些你都了解过吗?
# 二、事件监听机制
简单聊聊事件监听机制吧?
本章,从Spring内置事件、自定义事件和事件原理两个方面简单聊聊Spring中的事件监听机制。
# 2.1 事件原理
Spring中的事件监听总体上可以分成:事件、事件监听器和事件广播器。

其中,每个部分的主要说明如下所示。
- 事件:对应事件的监听器,事件源发生了某种事件后,会被对应的事件监听器感知到。
- 事件监听器:监听某种特定的事件,并且会对监听到的事件做对应的逻辑处理。对应观察者模式中的观察者。
- 事件广播器:对外提供维护事件监听器,比如新增事件监听器和删除事件监听器的接口,并且支持对外发布事件,维护事件监听器和事件之间的对应关系。也能够在发生事件时,通知对应的事件监听器。
在Spring的事件监听机制中,事件广播器和事件监听器之间还有一个EventMultiCaster角色负责把事件转发给事件监听器,如图21-2所示。
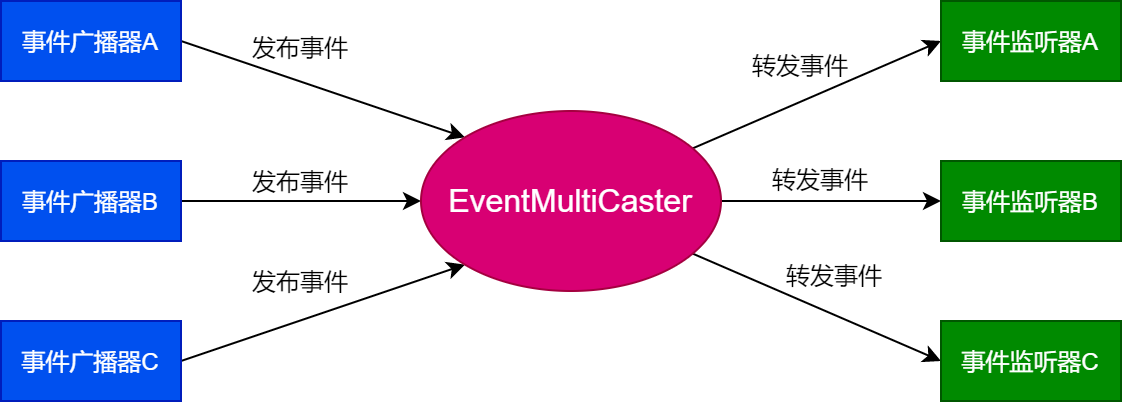
EventMultiCaster上注册着所有的事件监听器,事件广播器会将事件发送给EventMultiCaster,然后由EventMultiCaster将事件转发给事件监听器。
# 2.2 Spring内置事件
在Spring中,事件类需要继承ApplicationEvent类,Spring中的内置事件则会继承ApplicationContextEvent类。如图21-3所示。

Spring中的内置事件由Spring内部进行发布,不需要注入监听器,例如Spring中提供了如下事件类,都是Spring的内置事件。
- ContextRefreshedEvent:当IOC容器被实例化或者refresh()时会发布ContextRefreshedEvent事件,此时Bean都已经被IOC容器加载,后置处理器也已经被激活,所有的单例Bean都已经被实例化。
- ContextStartedEvent:当IOC容器启动,即调用start()方法时,会发布ContextStartedEvent事件,此时,所有处于生命周期内的Bean都接收到了start信号。
- ContextStoppedEvent:当IOC容器停止,即调用stop()方法时,会发布ContextStoppedEvent事件,此时,所有处于生命周期内的Bean都接收到了stop信号。调用stop()方法关闭的IOC容器,可以调用start()方法重启。
- ContextClosedEvent:当IOC容关闭,即调用close()方法时,会发布ContextClosedEvent事件,此时IOC容器中所有的单例Bean都已经被销毁。调用close()方法关闭的IOC容器,不能调用start()方法重启,也不能调用refresh()方法刷新IOC容器。
# 2.3 自定义事件
Spring允许基于ApplicationEvent类自定义监听的事件,如果在实际项目开发的过程中,需要使用自定义事件监听机制,则可以继承ApplicationEvent类实现要监听的事件,例如,如下代码所示。
public class ListenerEvent extends ApplicationEvent {
    private String name;
    public ListenerEvent(Object source, String name) {
        super(source);
        this.name = name;
    }
    public String getName() {
        return name;
    }
}
2
3
4
5
6
7
8
9
10
# 三、使用案例
一起实现事件监听的案例,怎么样?
本章,主要从同步和异步两个方面实现Spring的事件监听机制案例。
# 3.1 同步事件监听机制案例
本节,就简单实现一个Spring基于同步事件监听机制实现的案例程序,具体实现步骤如下所示。
(1)新增ListenerEvent类
ListenerEvent类的源码详见:spring-annotation-chapter-21工程下的io.binghe.spring.annotation.chapter21.event.ListenerEvent。
public class ListenerEvent extends ApplicationEvent {
    public static final String EVENT_SYNC = "sync";
    public static final String EVENT_ASYNC = "async";
    private String name;
    public ListenerEvent(Object source, String name) {
        super(source);
        this.name = name;
    }

    public String getName() {
        return name;
    }
}
2
3
4
5
6
7
8
9
10
11
12
13
可以看到,ListenerEvent类继承了ApplicationEvent类,说明ListenerEvent类是一个自定义的事件类。在ListenerEvent类中定义了两个常量,一个是EVENT_SYNC表示同步事件监听机制,一个是EVENT_ASYNC异步事件监听机制。
不管是实现同步事件监听机制的案例,还是实现异步事件监听机制的案例,都会使用ListenerEvent这个自定义事件类。
(2)新增SyncEventListener类
SyncEventListener类的源码详见:spring-annotation-chapter-21工程下的io.binghe.spring.annotation.chapter21.sync.listener.SyncEventListener。
@Component
public class SyncEventListener implements ApplicationListener<ListenerEvent> {
    @Override
    public void onApplicationEvent(ListenerEvent event) {
        if (ListenerEvent.EVENT_SYNC.equals(event.getName())){
            System.out.println("同步事件监听器...");
        }
    }
}
2
3
4
5
6
7
8
9
可以看到,SyncEventListener类实现了ApplicationListener接口,表示SyncEventListener类是一个事件监听器类,重写了ApplicationListener接口的onApplicationEvent()方法,用于监听同步事件。
在Spring中除了实现ApplicationListener接口来实现事件监听器外,也可以使用@EventListener注解实现事件监听,如下所示。
@Component
public class SyncAnnotationEventListener {
    @EventListener(ListenerEvent.class)
    public void onApplicationEvent(ListenerEvent event){
        if (ListenerEvent.EVENT_SYNC.equals(event.getName())){
            System.out.println("同步事件监听器...");
        }
    }
}
2
3
4
5
6
7
8
9
(3)新增SyncEventListenerConfig类
SyncEventListenerConfig类的源码详见:spring-annotation-chapter-21工程下的io.binghe.spring.annotation.chapter21.sync.config.SyncEventListenerConfig。
@Configuration
@ComponentScan(value = {"io.binghe.spring.annotation.chapter21.sync"})
public class SyncEventListenerConfig {
}
2
3
4
可以看到,在SyncEventListenerConfig类上标注了@Configuration注解,说明SyncEventListenerConfig类是案例程序的配置类,并使用@ComponentScan注解指定了要扫描的包名。
(4)新增SyncEventListenerTest类
SyncEventListenerTest类的源码详见:spring-annotation-chapter-21工程下的io.binghe.spring.annotation.chapter21.sync.SyncEventListenerTest。
public class SyncEventListenerTest {
    public static void main(String[] args) {
        AnnotationConfigApplicationContext context = new AnnotationConfigApplicationContext(SyncEventListenerConfig.class);
        context.publishEvent(new ListenerEvent(new SyncEventListenerTest(), ListenerEvent.EVENT_SYNC));
        context.close();
    }
}
2
3
4
5
6
7
可以看到,在SyncEventListenerTest类的main()方法中,通过context的publishEvent()方法发布事件。
(5)运行SyncEventListenerTest类
运行SyncEventListenerTest类的main()方法,输出的结果信息如下所示。
同步事件监听器...
可以看到,正确输出了SyncAnnotationEventListener类中打印的日志信息。
# 3.2 异步事件监听机制案例
本节,就简单实现一个Spring基于异步事件监听机制实现的案例程序,具体实现步骤如下所示。
(1)新增AsyncEventListener类
AsyncEventListener类的源码详见:spring-annotation-chapter-21工程下的io.binghe.spring.annotation.chapter21.async.listener.AsyncEventListener。
@Component
public class AsyncEventListener implements ApplicationListener<ListenerEvent> {
    @Override
    public void onApplicationEvent(ListenerEvent event) {
        if (ListenerEvent.EVENT_ASYNC.equals(event.getName())){
            System.out.println("异步事件监听器...");
        }
    }
}
2
3
4
5
6
7
8
9
可以看到,AsyncEventListener类与SyncEventListener类的实现基本相同,只是AsyncEventListener类会监听异步实现。除了可以实现ApplicationListener接口外,异步事件监听机制也可以基于@EventListener注解实现,如下所示。
@Component
public class AsyncAnnotationEventListener {
    @EventListener(ListenerEvent.class)
    public void onApplicationEvent(ListenerEvent event) {
        if (ListenerEvent.EVENT_ASYNC.equals(event.getName())){
            System.out.println("异步事件监听器...");
        }
    }
}
2
3
4
5
6
7
8
9
(2)新增ThreadPoolConfig类
ThreadPoolConfig类的源码详见:spring-annotation-chapter-21工程下的io.binghe.spring.annotation.chapter21.async.config.ThreadPoolConfig。
@Configuration
public class ThreadPoolConfig {
    @Bean("bingheExecutor")
    public Executor taskExecutor() {
        ThreadPoolTaskExecutor taskExecutor = new ThreadPoolTaskExecutor();
        //设置线程池参数信息
        taskExecutor.setCorePoolSize(8);
        taskExecutor.setMaxPoolSize(20);
        taskExecutor.setQueueCapacity(50);
        taskExecutor.setKeepAliveSeconds(60);
        taskExecutor.setThreadNamePrefix("binghe-executor--");
        taskExecutor.setWaitForTasksToCompleteOnShutdown(true);
        // 设置线程池中任务的等待时间,如果超过这个时候还没有销毁就强制销毁,以确保应用最后能够被关闭,而不是阻塞住。
        taskExecutor.setAwaitTerminationSeconds(60);
        //修改拒绝策略为使用当前线程执行
        taskExecutor.setRejectedExecutionHandler(new ThreadPoolExecutor.CallerRunsPolicy());
        //初始化线程池
        taskExecutor.initialize();
        return taskExecutor;
    }
}
2
3
4
5
6
7
8
9
10
11
12
13
14
15
16
17
18
19
20
21
可以看到,在ThreadPoolConfig类中主要实现了一个线程池。
(3)新增AsyncEventListenerConfig类
AsyncEventListenerConfig类的源码详见:spring-annotation-chapter-21工程下的io.binghe.spring.annotation.chapter21.async.config.AsyncEventListenerConfig。
@Configuration
@ComponentScan(value = {"io.binghe.spring.annotation.chapter21.async"})
public class AsyncEventListenerConfig {
    @Autowired
    @Qualifier("bingheExecutor")
    private Executor taskExecutor;

    @Bean(name = AbstractApplicationContext.APPLICATION_EVENT_MULTICASTER_BEAN_NAME)
    public ApplicationEventMulticaster applicationEventMulticaster(){
        SimpleApplicationEventMulticaster simpleApplicationEventMulticaster = new SimpleApplicationEventMulticaster();
        simpleApplicationEventMulticaster.setTaskExecutor(taskExecutor);
        return simpleApplicationEventMulticaster;
    }
}
2
3
4
5
6
7
8
9
10
11
12
13
14
可以看到,在AsyncEventListenerConfig类中注入了线程池taskExecutor,并向IOC容器中重新注入了ApplicationEventMulticaster类型的Bean对象,通过setTaskExecutor()方法向ApplicationEventMulticaster类型的Bean对象中设置了线程池对象。
(4)新增AsyncEventListenerTest类
AsyncEventListenerTest类的源码详见:spring-annotation-chapter-21工程下的io.binghe.spring.annotation.chapter21.async.AsyncEventListenerTest。
public class AsyncEventListenerTest {
    public static void main(String[] args) {
        AnnotationConfigApplicationContext context = new AnnotationConfigApplicationContext(AsyncEventListenerConfig.class);
        context.publishEvent(new ListenerEvent(new AsyncEventListenerTest(), ListenerEvent.EVENT_ASYNC));
        context.close();
    }
}
2
3
4
5
6
7
可以看到,在AsyncEventListenerTest类中,也会调用context的publishEvent()发布异步事件。
(5)运行AsyncEventListenerTest类
运行AsyncEventListenerTest类的main()方法,输出的结果信息如下所示。
异步事件监听器...
可以看到,结果信息中打印了在AsyncAnnotationEventListener类中输出的结果信息。
# 查看完整文章
加入冰河技术 (opens new window)知识星球,解锁完整技术文章与完整代码