# 《Spring核心技术》第16章-注入数据型注解:深度解析@Primary注解
作者:冰河
星球:http://m6z.cn/6aeFbs (opens new window)
博客:https://binghe.gitcode.host (opens new window)
文章汇总:https://binghe.gitcode.host/md/all/all.html (opens new window)
源码地址:https://github.com/binghe001/spring-annotation-book/tree/master/spring-annotation-chapter-16 (opens new window)
沉淀,成长,突破,帮助他人,成就自我。
大家好,我是冰河~~
本章难度:★★★★☆
本章重点:进一步学习并掌握@Primary注解指定Bean优先级的案例和流程,从源码级别彻底掌握@Primary注解在Spring底层的执行流程。
本节目录如下所示:
- 学习指引
- 注解说明
- 注解源码
- 使用场景
- 使用案例
- 源码时序图
- 注册Bean的流程
- 调用Bean工厂后置处理器
- 创建Bean的流程
- 源码解析
- 注册Bean的流程
- 调用Bean工厂后置处理器
- 创建Bean的流程
- 总结
- 思考
- VIP服务
# 一、学习指引
Spring中的@Primary注解,你真的彻底了解过吗?
通过前面的文章,我们得知:使用@Autowired装配Bean对象时,如果存在多个类型相同的Bean时,可以使用@Qualifier注解明确指定装配哪个Bean。除了使用@Qualifier注解,也可以使用@Primary注解。
# 二、注解说明
关于@Primary注解的一点点说明~~
使用@Autowired装配Bean对象时,如果存在多个类型相同的Bean时,也可以使用@Primary注解指定Bean的优先级。被@Primary注解标注的Bean对象会被优先注入。
# 2.1 注解源码
@Primary注解的源码详见:org.springframework.context.annotation.Primary。
 /*
 * @author Chris Beams
 * @author Juergen Hoeller
 * @since 3.0
 * @see Lazy
 * @see Bean
 * @see ComponentScan
 * @see org.springframework.stereotype.Component
 */
@Target({ElementType.TYPE, ElementType.METHOD})
@Retention(RetentionPolicy.RUNTIME)
@Documented
public @interface Primary {
}
2
3
4
5
6
7
8
9
10
11
12
13
14
从@Primary注解的源码可以看出,@Primary注解是从Spring3.0版本开始提供的注解,可以标注到类和方法上,并且在@Primary注解中没有提供任何属性。
# 2.2 使用场景
如果依赖的对象存在多个类型相同的Bean时,使用@Autowired注解已经无法正确完成Bean的装配工作。此时,可以使用@Qualifier注解明确指定要装配的Bean对象。也可以使用@Primary注解优先装配对应的Bean对象。
# 三、使用案例
@Primary优先注入Bean的案例,我们一起实现吧~~
本节,就基于@Primary注解与@Bean注解实现向Bean属性中优先注入Bean的案例,具体的实现步骤如下所示。
(1)新增PrimaryDao类
PrimaryDao类的源码详见:spring-annotation-chapter-16工程下的io.binghe.spring.annotation.chapter16.dao.PrimaryDao。
public interface PrimaryDao {
}
2
可以看到,PrimaryDao就是一个普通的Java接口。
(2)新增PrimaryDao1类
PrimaryDao1类的源码详见:spring-annotation-chapter-16工程下的io.binghe.spring.annotation.chapter16.dao.impl.PrimaryDao1。
public class PrimaryDao1 implements PrimaryDao {
}
2
可以看到,PrimaryDao1类是一个普通的Java类,并且实现了PrimaryDao接口。
(3)新增PrimaryDao2类
PrimaryDao2类的源码详见:spring-annotation-chapter-16工程下的io.binghe.spring.annotation.chapter16.dao.impl.PrimaryDao2。
public class PrimaryDao2 implements PrimaryDao {
}
2
可以看到,PrimaryDao2类同样是一个普通的Java类,同样实现了PrimaryDao接口。
(4)新增PrimaryService类
PrimaryService类的源码详见:spring-annotation-chapter-16工程下的io.binghe.spring.annotation.chapter16.service.PrimaryService。
@Service
public class PrimaryService {
    @Autowired
    private PrimaryDao primaryDao;
    @Override
    public String toString() {
        return "PrimaryService{" +
                "primaryDao=" + primaryDao +
                '}';
    }
}
2
3
4
5
6
7
8
9
10
11
可以看到,PrimaryService类上标注了@Service注解,说明PrimaryService类的Bean对象在IOC容器启动时就会被注入IOC容器中,在PrimaryService类中使用@Autowired注解注入了PrimaryDao类的Bean对象。
(5)新增PrimaryConfig类
PrimaryConfig类的源码详见:spring-annotation-chapter-16工程下的io.binghe.spring.annotation.chapter16.config.PrimaryConfig。
@Configuration
@ComponentScan(basePackages = {"io.binghe.spring.annotation.chapter16"})
public class PrimaryConfig {
    @Bean
    @Primary
    public PrimaryDao primaryDao1(){
        return new PrimaryDao1();
    }
    @Bean
    public PrimaryDao primaryDao2(){
        return new PrimaryDao2();
    }
}
2
3
4
5
6
7
8
9
10
11
12
13
可以看到,PrimaryConfig类上标注了@Configuration注解,说明PrimaryConfig类是案例的Spring配置类,并且使用@ComponentScan注解指定了要扫描的包。在PrimaryConfig类中,使用@Bean注解向IOC容器中注入两个PrimaryDao类型的Bean,一个Bean的默认名称为primaryDao1,另一个Bean的默认名称为primaryDao2。
(6)新增PrimaryTest类
PrimaryTest类的源码详见:spring-annotation-chapter-16工程下的io.binghe.spring.annotation.chapter16.PrimaryTest。
public class PrimaryTest {
    public static void main(String[] args) {
        AnnotationConfigApplicationContext context = new AnnotationConfigApplicationContext(PrimaryConfig.class);
        PrimaryService primaryService = context.getBean(PrimaryService.class);
        System.out.println(primaryService);
    }
}
2
3
4
5
6
7
可以看到,在PrimaryTest类的main()方法中,从IOC容器中获取PrimaryService对象后并进行打印。
(7)运行PrimaryTest类
运行PrimaryTest类的main()方法,输出的结果信息如下所示。
PrimaryService{primaryDao=io.binghe.spring.annotation.chapter16.dao.impl.PrimaryDao1@429bffaa}
从输出的结果信息可以看出,使用@Primary注解后,向PrimaryService类中优先成功注入了PrimaryDao1类的Bean对象。
大家可以自行在PrimaryConfig类中将@Primary注解标注到primaryDao2()方法上,运行运行PrimaryTest类的main()方法,观察输出的结果,此时向PrimaryService类中就会成功注入PrimaryDao2类的Bean对象,这里不再赘述。
# 四、源码时序图
结合时序图理解源码会事半功倍,你觉得呢?
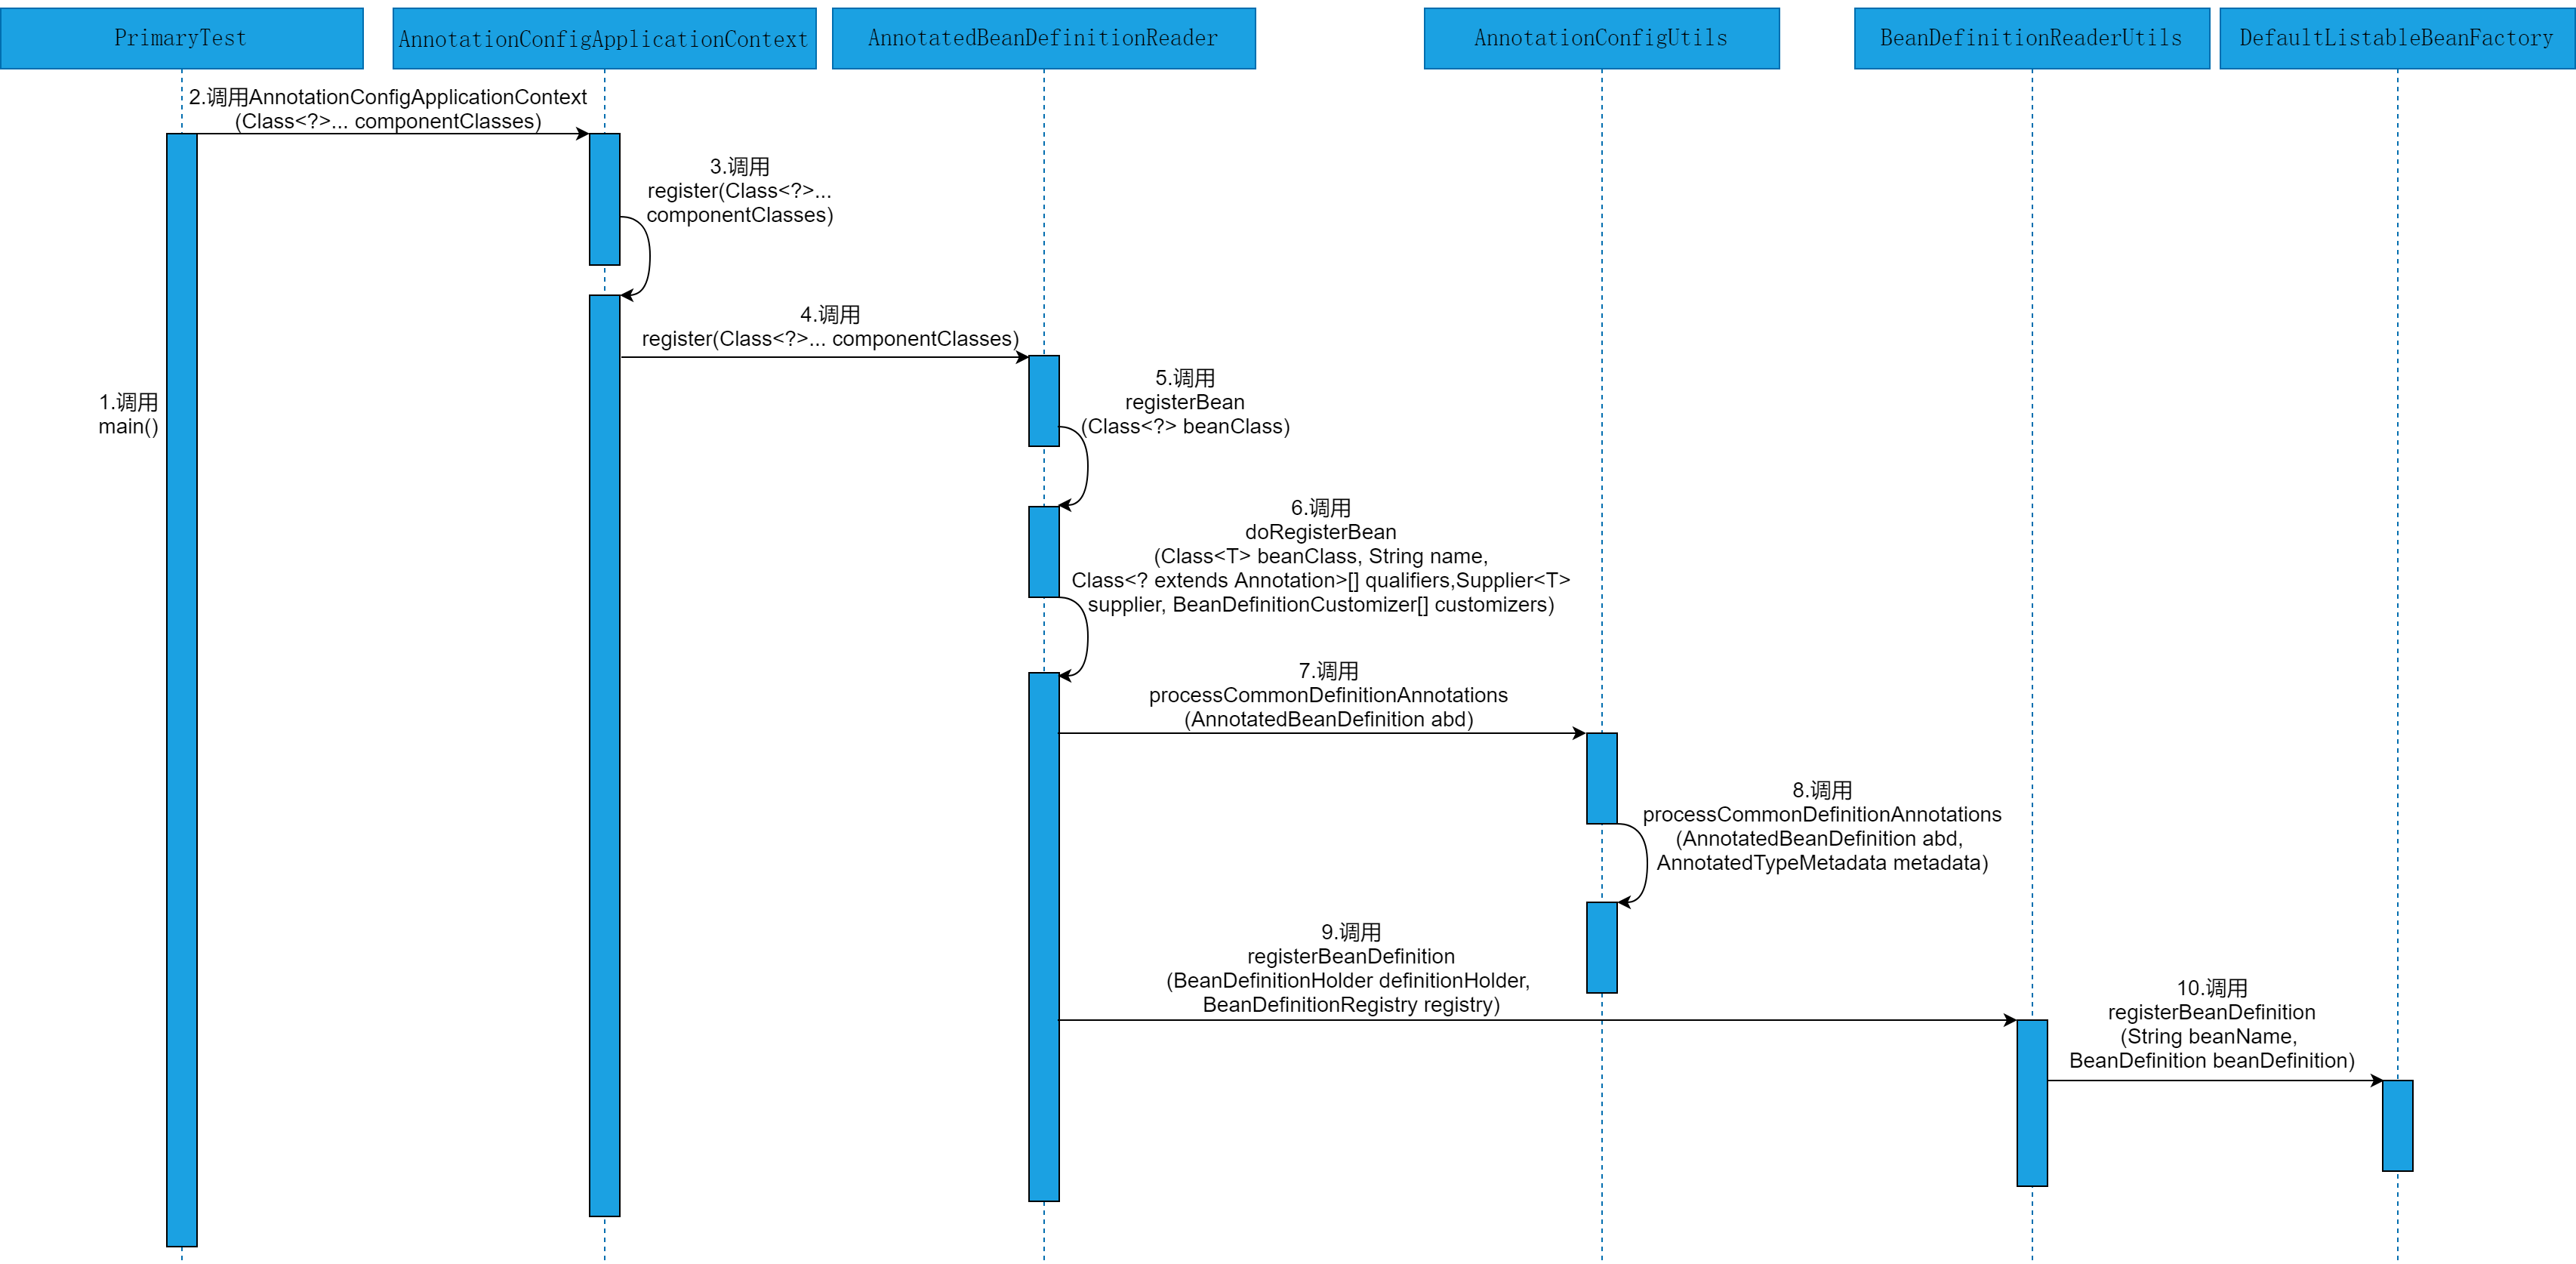
本章,会从注册Bean的流程、调用Bean工厂后置处理器和创建Bean的流程三个方面分析@Primary注解的源码时序图。
# 4.1 注册Bean的流程
@Primary注解涉及到的注册Bean流程的源码时序图如图16-1所示。

# 查看完整文章
加入冰河技术 (opens new window)知识星球,解锁完整技术文章与完整代码
