# SA实战 ·《SpringCloud Alibaba实战》第13章-服务网关:项目整合SpringCloud Gateway网关
作者:冰河
星球:http://m6z.cn/6aeFbs (opens new window)
博客:https://binghe.site (opens new window)
文章汇总:https://binghe.site/md/all/all.html (opens new window)
大家好,我是冰河~~
一不小心《SpringCloud Alibaba实战 (opens new window)》专栏都更新到第13章了,再不上车就跟不上了,小伙伴们快跟上啊!
注意:本项目完整源码加入 冰河技术 (opens new window) 知识星球即可获取,文末有优惠券。
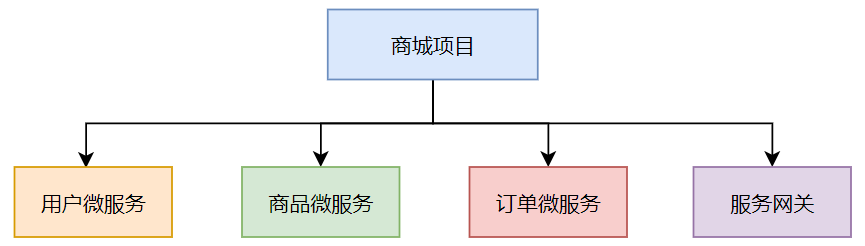
在《SpringCloud Alibaba实战 (opens new window)》专栏前面的文章中,我们实现了用户微服务、商品微服务和订单微服务之间的远程调用,并且实现了服务调用的负载均衡。也基于阿里开源的Sentinel实现了服务的限流与容错,并详细介绍了Sentinel的核心技术与配置规则,同时,简单介绍了服务网关,并对SpringCloud Gateway的核心架构进行了简要说明 。今天,我们就正式在项目中整合SpringCloud Gateway网关
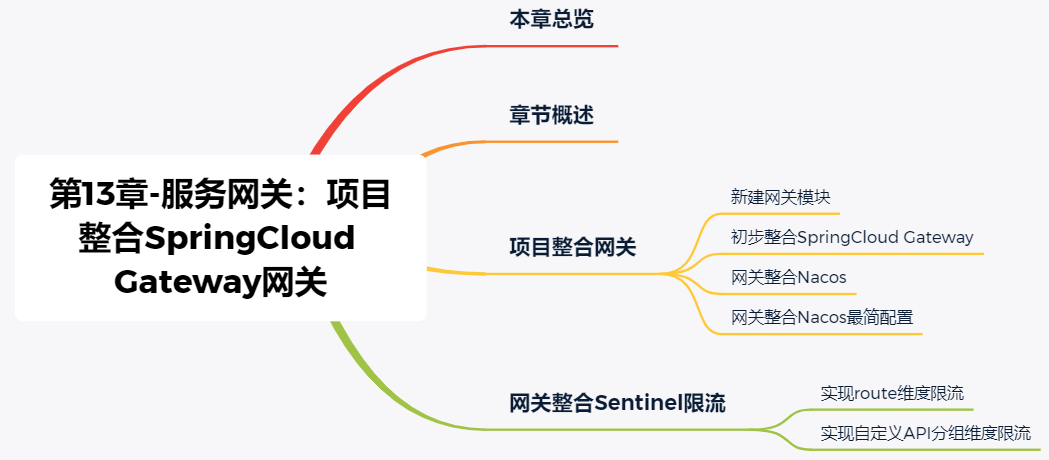
# 本章总览
# 章节概述
今天,我们就在项目中整合SpringCloud Gateway来为项目增加API网关,同时,会将SpringCloud Gateway与Sentinel进行整合实现网关的限流能力。说干就干,小伙伴们跟上发车速度。
# 项目整合网关
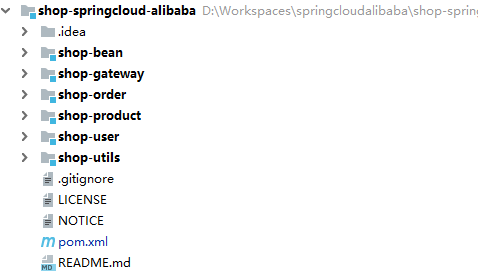
我们需要在项目中增加一个服务网关模块shop-gateway,在服务网关模块中实现网关的能力。此时,我们的项目中就会有用户微服务、商品微服务、订单微服务和服务网关。
# 新建网关模块
在项目中新建shop-gateway模块,新增网关模块后项目的结构如下图所示。
# 初步整合SpringCloud Gateway
(1)在服务网关shop-gateway模块的pom.xml文件中添加如下依赖。
<dependencies>
    <dependency>
        <groupId>org.springframework.cloud</groupId>
        <artifactId>spring-cloud-starter-gateway</artifactId>
    </dependency>
</dependencies>
2
3
4
5
6
(2)在服务网关shop-gateway模块的resources目录下新建application.yml文件,并在文件中添加如下配置信息。
server:
  port: 10001
spring:
  application:
    name: server-gateway
  cloud:
    gateway:
      globalcors:
        cors-configurations:
          '[/**]':
            allowedOrigins: "*"
            allowedMethods: "*"
            allowCredentials: true
            allowedHeaders: "*"

      routes:
        - id: user-gateway
          uri: http://localhost:8060
          order: 1
          predicates:
            - Path=/server-user/**
          filters:
            - StripPrefix=1

        - id: product-gateway
          uri: http://localhost:8070
          order: 1
          predicates:
            - Path=/server-product/**
          filters:
            - StripPrefix=1

        - id: order-gateway
          uri: http://localhost:8080
          order: 1
          predicates:
            - Path=/server-order/**
          filters:
            - StripPrefix=1
2
3
4
5
6
7
8
9
10
11
12
13
14
15
16
17
18
19
20
21
22
23
24
25
26
27
28
29
30
31
32
33
34
35
36
37
38
39
我们重点来看下 spring.cloud.gateway 节点下的配置。
globalcors:此节点下的配置是为了解决SpringCloud Gateway跨域的问题。
routes:表示一个路由数组,可以在此节点下配置多个路由信息。
id:当前路由的唯一标识。
order:路由的优先级,数字越小表示优先级越高。
predicates:网关断言,也就是路由转发的条件,也是一个数组,可以配置多个路由转发条件。
Path:当客户端请求的路径满足Path的规则时,进行路由转发操作。
filters:网关过滤器,在过滤器中可以修改请求的参数和header信息,以及响应的结果和header信息,网关过滤器也是一个数组,可以配置多个过滤规则。
StripPrefix:网关在进行路由转发之前,会去掉1层访问路径。
(3)在服务网关shop-gateway模块的io.binghe.shop包下新建GatewayStarter类,表示服务网关的启动类,源码如下所示。
/**
 * @author binghe (公众号:冰河技术)
 * @version 1.0.0
 * @description 服务网关启动类
 */
@SpringBootApplication
public class GatewayStarter {
    public static void main(String[] args){
        SpringApplication.run(GatewayStarter.class, args);
    }
}
2
3
4
5
6
7
8
9
10
11
(4)由于之前项目中整合了Nacos和Sentinel,所以,在启动项目前,要分别启动Nacos和Sentinel。
- 进入到Nacos的bin目录下,输入如下命令启动Nacos。
startup.cmd -m standalone
- 进入Sentinel Jar包所在的目录,输入如下命令启动Sentinel。
java -Dserver.port=8888 -Dcsp.sentinel.dashboard.server=localhost:8888 -Dproject.name=sentinel-dashboard -jar sentinel-dashboard-1.8.4.jar
(5)分别启动用户微服务、商品微服务、订单微服务和服务网关。
(6)通过服务网关访问用户微服务,在浏览器中输入http://localhost:10001/server-user/user/get/1001,如下所示。
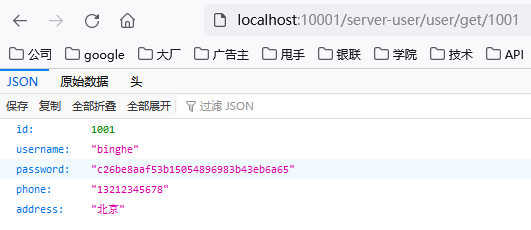
用户微服务返回的原始数据如下所示。
{
  "id": 1001,
  "username": "binghe",
  "password": "c26be8aaf53b15054896983b43eb6a65",
  "phone": "13212345678",
  "address": "北京"
}
2
3
4
5
6
7
可以看到,通过服务网关能够正确访问到用户微服务。
(7)通过服务网关访问商品微服务,在浏览器中输入http://localhost:10001/server-product/product/get/1001,如下所示。
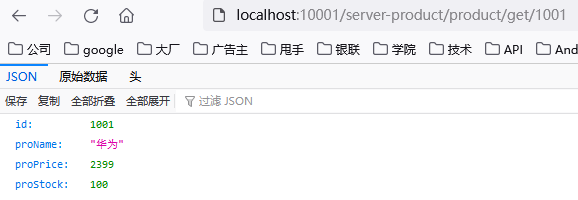
商品微服务返回的原始数据如下所示。
{
  "id": 1001,
  "proName": "华为",
  "proPrice": 2399,
  "proStock": 100
}
2
3
4
5
6
可以看到,通过服务网关能够正确访问到商品微服务。
(8)通过服务网关访问订单微服务,在浏览器中输入http://localhost:10001/server-order/order/test_sentinel,如下所示。

可以看到,通过服务网关能够正确访问到订单微服务。
# 网关整合Nacos
在初步整合SpringCloud Gateway中,我们在服务网关模块的application.yml文件中硬编码配置了服务转发的地址,如下所示。
- 硬编码用户微服务地址
uri: http://localhost:8060
- 硬编码商品微服务地址
uri: http://localhost:8070
- 硬编码订单微服务地址
uri: http://localhost:8080
这里,我们将网关整合Nacos实现从Nacos注册中心获取转发的服务地址。
(1)在服务网关shop-gateway模块的pom.xml文件中继续添加如下依赖。
<dependency>
    <groupId>com.alibaba.cloud</groupId>
    <artifactId>spring-cloud-starter-alibaba-nacos-discovery</artifactId>
</dependency>
2
3
4
(2)在服务网关shop-gateway模块的启动类io.binghe.shop.GatewayStarter上添加@EnableDiscoveryClient注解,如下所示。
/**
 * @author binghe (公众号:冰河技术)
 * @version 1.0.0
 * @description 服务网关启动类
 */
@SpringBootApplication
@EnableDiscoveryClient
public class GatewayStarter {
    public static void main(String[] args){
        SpringApplication.run(GatewayStarter.class, args);
    }
}
2
3
4
5
6
7
8
9
10
11
12
(3)将application.yml备份一份,命名为application-simple.yml,并修改application.yml配置文件,修改后的文件如下所示。
server:
  port: 10001
spring:
  application:
    name: server-gateway

  cloud:
    nacos:
      discovery:
        server-addr: 127.0.0.1:8848

    gateway:
      globalcors:
        cors-configurations:
          '[/**]':
            allowedOrigins: "*"
            allowedMethods: "*"
            allowCredentials: true
            allowedHeaders: "*"
      discovery:
        locator:
          enabled: true

      routes:
        - id: user-gateway
          uri: lb://server-user
          order: 1
          predicates:
            - Path=/server-user/**
          filters:
            - StripPrefix=1

        - id: product-gateway
          uri: lb://server-product
          order: 1
          predicates:
            - Path=/server-product/**
          filters:
            - StripPrefix=1

        - id: order-gateway
          uri: lb://server-order
          order: 1
          predicates:
            - Path=/server-order/**
          filters:
            - StripPrefix=1
2
3
4
5
6
7
8
9
10
11
12
13
14
15
16
17
18
19
20
21
22
23
24
25
26
27
28
29
30
31
32
33
34
35
36
37
38
39
40
41
42
43
44
45
46
47
上述配置中增加了Nacos相关的配置,如下所示。
spring:
  cloud:
    nacos:
      discovery:
        server-addr: 127.0.0.1:8848
2
3
4
5
新增了让SpringCloud Gateway可以发现Nacos中的服务配置,如下所示。
Spring:
  cloud:
    gateway:
      discovery:
        locator:
          enabled: true
2
3
4
5
6
另外,将硬编码的服务转发地址修改成从Nacos中按照名称获取微服务地址,并按照负载均衡策略分发。
- 从Nacos中获取用户微服务
uri: lb://server-user
- 从Nacos中获取商品微服务
uri: lb://server-product
- 从Nacos中获取订单微服务
uri: lb://server-order
其中,lb指的是从Nacos中按照微服务的名称获取微服务地址,并按照负载均衡的策略分发。使用lb从Nacos中获取微服务时,遵循如下的格式。
lb://微服务名称
微服务的名称就是各个微服务在application.yml文件中配置的服务名称。
spring:
  application:
    name: 服务名称
2
3
(4)分别启动用户微服务、商品微服务、订单微服务和服务网关。
(5)通过服务网关访问用户微服务,在浏览器中输入http://localhost:10001/server-user/user/get/1001,如下所示。
用户微服务返回的原始数据如下所示。
{
  "id": 1001,
  "username": "binghe",
  "password": "c26be8aaf53b15054896983b43eb6a65",
  "phone": "13212345678",
  "address": "北京"
}
2
3
4
5
6
7
可以看到,通过服务网关能够正确访问到用户微服务。
(6)通过服务网关访问商品微服务,在浏览器中输入http://localhost:10001/server-product/product/get/1001,如下所示。
商品微服务返回的原始数据如下所示。
{
  "id": 1001,
  "proName": "华为",
  "proPrice": 2399,
  "proStock": 100
}
2
3
4
5
6
可以看到,通过服务网关能够正确访问到商品微服务。
(7)通过服务网关访问订单微服务,在浏览器中输入http://localhost:10001/server-order/order/test_sentinel,如下所示。
可以看到,通过服务网关能够正确访问到订单微服务。
# 网关整合Nacos最简配置
SpringCloud Gateway整合Nacos后,可以不用手动指定其他微服务的名称来从Nacos中获取微服务的地址。接下来,我们就来实现SpringCloud Gateway网关整合Nacos的最简配置。
(1)将application.yml备份一份,命名为application-nacos.yml,并修改application.yml配置文件,修改后的文件如下所示。
server:
  port: 10001
spring:
  application:
    name: server-gateway

  cloud:
    nacos:
      discovery:
        server-addr: 127.0.0.1:8848

    gateway:
      globalcors:
        cors-configurations:
          '[/**]':
            allowedOrigins: "*"
            allowedMethods: "*"
            allowCredentials: true
            allowedHeaders: "*"
      discovery:
        locator:
          enabled: true
2
3
4
5
6
7
8
9
10
11
12
13
14
15
16
17
18
19
20
21
22
可以看到,在application.yml文件中,去掉了spring.cloud.gateway.routes 节点及其下面的所有配置。
(2)分别启动用户微服务、商品微服务、订单微服务和服务网关。
(3)通过服务网关访问用户微服务,在浏览器中输入http://localhost:10001/server-user/user/get/1001,如下所示。
用户微服务返回的原始数据如下所示。
{
  "id": 1001,
  "username": "binghe",
  "password": "c26be8aaf53b15054896983b43eb6a65",
  "phone": "13212345678",
  "address": "北京"
}
2
3
4
5
6
7
可以看到,通过服务网关能够正确访问到用户微服务。
(4)通过服务网关访问商品微服务,在浏览器中输入http://localhost:10001/server-product/product/get/1001,如下所示。
商品微服务返回的原始数据如下所示。
{
  "id": 1001,
  "proName": "华为",
  "proPrice": 2399,
  "proStock": 100
}
2
3
4
5
6
可以看到,通过服务网关能够正确访问到商品微服务。
(5)通过服务网关访问订单微服务,在浏览器中输入http://localhost:10001/server-order/order/test_sentinel,如下所示。
可以看到,通过服务网关能够正确访问到订单微服务。
注意:SpringCloud Gateway整合Nacos最简配置时,通过网关访问微服务的格式如下所示。
http(s)://网关IP:网关端口/访问的目标微服务名称/接口地址
# 网关整合Sentinel限流
Sentinel从1.6.0版本开始,提供了SpringCloud Gateway的适配模块,并且可以提供两种资源维度的限流,一种是route维度;另一种是自定义API分组维度。
- route维度:对application.yml文件中配置的
spring.cloud.gateway.routes.id限流,并且资源名为spring.cloud.gateway.routes.id对应的值。 - 自定义API分组维度:利用Sentinel提供的API接口来自定义API分组,并且对这些API分组进行限流。
# 实现route维度限流
(1)在服务网关shop-gateway模块的pom.xml文件中添加如下依赖。
<dependencies>
    <dependency>
        <groupId>com.alibaba.cloud</groupId>
        <artifactId>spring-cloud-starter-alibaba-sentinel</artifactId>
    </dependency>

    <dependency>
        <groupId>com.alibaba.cloud</groupId>
        <artifactId>spring-cloud-alibaba-sentinel-gateway</artifactId>
    </dependency>

    <dependency>
        <groupId>org.springframework.cloud</groupId>
        <artifactId>spring-cloud-starter-gateway</artifactId>
    </dependency>

    <dependency>
        <groupId>com.alibaba.cloud</groupId>
        <artifactId>spring-cloud-starter-alibaba-nacos-discovery</artifactId>
    </dependency>

    <dependency>
        <groupId>com.alibaba.csp</groupId>
        <artifactId>sentinel-spring-cloud-gateway-adapter</artifactId>
    </dependency>
</dependencies>
2
3
4
5
6
7
8
9
10
11
12
13
14
15
16
17
18
19
20
21
22
23
24
25
26
(2)在服务网关shop-gateway模块中新建io.binghe.shop.config包,并在包下新建GatewayConfig类。基于Sentinel 的Gateway限流是通过其提供的Filter来完成的,使用时只需注入对应的SentinelGatewayFilter实例以及 SentinelGatewayBlockExceptionHandler 实例即可。
GatewayConfig类的源代码如下所示。
/**
 * @author binghe (公众号:冰河技术)
 * @version 1.0.0
 * @description 网关配置类
 */
@Configuration
public class GatewayConfig {

    private final List<ViewResolver> viewResolvers;

    private final ServerCodecConfigurer serverCodecConfigurer;

    @Value("${spring.cloud.gateway.discovery.locator.route-id-prefix}")
    private String routeIdPrefix;

    public GatewayConfig(ObjectProvider<List<ViewResolver>> viewResolversProvider,
                                ServerCodecConfigurer serverCodecConfigurer) {
        this.viewResolvers = viewResolversProvider.getIfAvailable(Collections::emptyList);
        this.serverCodecConfigurer = serverCodecConfigurer;
    }

    /**
     * 初始化一个限流的过滤器
     */
    @Bean
    @Order(Ordered.HIGHEST_PRECEDENCE)
    public GlobalFilter sentinelGatewayFilter() {
        return new SentinelGatewayFilter();
    }

    @PostConstruct
    public void init() {
       this.initGatewayRules();
       this.initBlockHandlers();
    }

    /**
     * 配置初始化的限流参数
     */
    private void initGatewayRules() {
        Set<GatewayFlowRule> rules = new HashSet<>();

        /**
         * Sentinel整合SpringCloud Gateway使用的API类型为Route ID类型,也就是基于route维度时,
         * 由于Sentinel为SpringCloud Gateway网关生成的API名称规则如下:
         * 生成的规则为:${spring.cloud.gateway.discovery.locator.route-id-prefix}后面直接加上目标微服务的名称,如下所示。
         * ${spring.cloud.gateway.discovery.locator.route-id-prefix}目标微服务的名称
         * 其中,${spring.cloud.gateway.discovery.locator.route-id-prefix}是在yml文件中配置的访问前缀
         *
         * 为了让通过服务网关访问目标微服务链接后,请求链路中生成的API名称与流控规则中生成的API名称一致,以达到启动项目即可实现访问链接的限流效果,
         * 而无需登录Setinel管理界面手动配置限流规则,可以将
         * resource参数设置为${spring.cloud.gateway.discovery.locator.route-id-prefix}目标微服务的名称
         *
         * 当然,如果不按照上述配置,也可以在项目启动后,通过服务网关访问目标微服务链接后,在Sentinel管理界面的请求链路中找到对应的API名称所代表的请求链路,
         * 然后手动配置限流规则。
         **/
//        //用户微服务网关
//        rules.add(this.getGatewayFlowRule("user-gateway"));
//        //商品微服务网关
//        rules.add(this.getGatewayFlowRule("product-gateway"));
//        //订单微服务网关
//        rules.add(this.getGatewayFlowRule("order-gateway"));
        //用户微服务网关
        rules.add(this.getGatewayFlowRule(getResource("server-user")));
        //商品微服务网关
        rules.add(this.getGatewayFlowRule(getResource("server-product")));
        //订单微服务网关
        rules.add(this.getGatewayFlowRule(getResource("server-order")));
        //加载规则
        GatewayRuleManager.loadRules(rules);
    }

    private String getResource(String targetServiceName){
        if (routeIdPrefix == null){
            routeIdPrefix = "";
        }
        return routeIdPrefix.concat(targetServiceName);
    }

    private GatewayFlowRule getGatewayFlowRule(String resource){
        //传入资源名称生成GatewayFlowRule
        GatewayFlowRule gatewayFlowRule = new GatewayFlowRule(resource);
        //限流阈值
        gatewayFlowRule.setCount(1);
        //统计的时间窗口,单位为
        gatewayFlowRule.setIntervalSec(1);
        return gatewayFlowRule;
    }

    /**
     * 配置限流的异常处理器
     */
    @Bean
    @Order(Ordered.HIGHEST_PRECEDENCE)
    public SentinelGatewayBlockExceptionHandler sentinelGatewayBlockExceptionHandler() {
        return new SentinelGatewayBlockExceptionHandler(viewResolvers, serverCodecConfigurer);
    }

    /**
     * 自定义限流异常页面
     */
    private void initBlockHandlers() {
        BlockRequestHandler blockRequestHandler = new BlockRequestHandler() {
            @Override
            public Mono<ServerResponse> handleRequest(ServerWebExchange serverWebExchange, Throwable throwable) {
                Map map = new HashMap<>();
                map.put("code", 1001);
                map.put("codeMsg", "接口被限流了");
                return ServerResponse.status(HttpStatus.OK).
                        contentType(MediaType.APPLICATION_JSON_UTF8).
                        body(BodyInserters.fromObject(map));
            }
        };
        GatewayCallbackManager.setBlockHandler(blockRequestHandler);
    }
}
2
3
4
5
6
7
8
9
10
11
12
13
14
15
16
17
18
19
20
21
22
23
24
25
26
27
28
29
30
31
32
33
34
35
36
37
38
39
40
41
42
43
44
45
46
47
48
49
50
51
52
53
54
55
56
57
58
59
60
61
62
63
64
65
66
67
68
69
70
71
72
73
74
75
76
77
78
79
80
81
82
83
84
85
86
87
88
89
90
91
92
93
94
95
96
97
98
99
100
101
102
103
104
105
106
107
108
109
110
111
112
113
114
115
116
GatewayConfig类的源代码看上去比较多,但是都是一些非常简单的方法,冰河在这里就不再赘述了。
这里有个需要特别注意的地方:
Sentinel1.8.4整合SpringCloud Gateway使用的API类型为Route ID类型时,也就是基于route维度时,由于Sentinel为SpringCloud Gateway网关生成的API名称规则如下:
生成的规则为:${spring.cloud.gateway.discovery.locator.route-id-prefix}后面直接加上目标微服务的名称,如下所示。 ${spring.cloud.gateway.discovery.locator.route-id-prefix}目标微服务的名称。其中,${spring.cloud.gateway.discovery.locator.route-id-prefix}是在yml文件中配置的访问前缀。
为了让通过服务网关访问目标微服务链接后,请求链路中生成的API名称与流控规则中生成的API名称一致,以达到启动项目即可实现访问链接的限流效果,而无需登录Setinel管理界面手动配置限流规则,可以将生成GatewayFlowRule对象的resource参数设置为${spring.cloud.gateway.discovery.locator.route-id-prefix}目标微服务的名称
当然,如果不按照上述配置,也可以在项目启动后,通过服务网关访问目标微服务链接后,在Sentinel管理界面的请求链路中找到对应的API名称所代表的请求链路,然后手动配置限流规则。
(3)将服务网关shop-gateway模块的application.yml文件备份一份名称为application-nacos-simple.yml的文件,并将application.yml文件的内容修改成如下所示。
server:
  port: 10001
spring:
  application:
    name: server-gateway
  main:
    allow-bean-definition-overriding: true
  cloud:
    nacos:
      discovery:
        server-addr: 127.0.0.1:8848
    sentinel:
      transport:
        port: 7777
        dashboard: 127.0.0.1:8888
      web-context-unify: false
      eager: true

    gateway:
      globalcors:
        cors-configurations:
          '[/**]':
            allowedOrigins: "*"
            allowedMethods: "*"
            allowCredentials: true
            allowedHeaders: "*"
      discovery:
        locator:
          enabled: true
          route-id-prefix: gateway-
2
3
4
5
6
7
8
9
10
11
12
13
14
15
16
17
18
19
20
21
22
23
24
25
26
27
28
29
30
其中:
spring.cloud.sentinel.eager表示程序启动时,流控规则是否立即注册到Sentinel,配置为true表示立即注册到Sentinel。spring.cloud.gateway.discovery.locator.route-id-prefix:生成流控规则API名称的前缀。
(4)在IDEA中配置启动服务网关shop-gateway模块的参数-Dcsp.sentinel.app.type=1,如下所示。
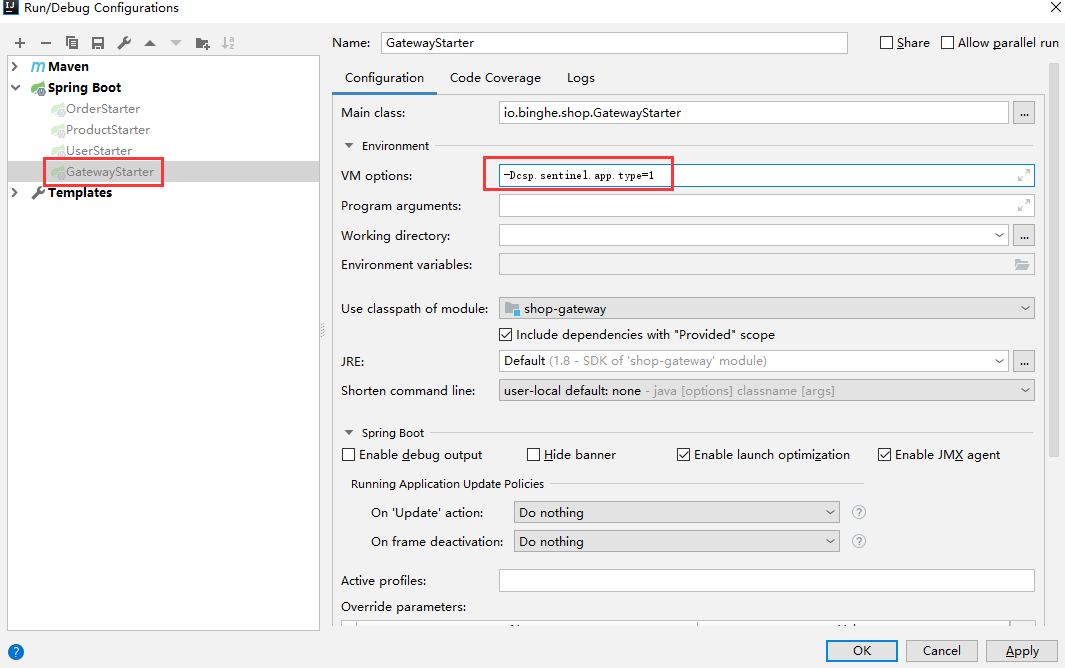
如果是在命令行启动网关服务的Jar包,则可以使用如下命令。
java -Dcsp.sentinel.app.type=1 shop-gateway.jar
或者在启动类io.binghe.shop.GatewayStarter的main()方法中添加一行System.setProperty("csp.sentinel.app.type", "1");代码,如下所示。
/**
 * @author binghe (公众号:冰河技术)
 * @version 1.0.0
 * @description 服务网关启动类
 */
@SpringBootApplication
@EnableDiscoveryClient
public class GatewayStarter {
    public static void main(String[] args){
        System.setProperty("csp.sentinel.app.type", "1");
        SpringApplication.run(GatewayStarter.class, args);
    }
}
2
3
4
5
6
7
8
9
10
11
12
13
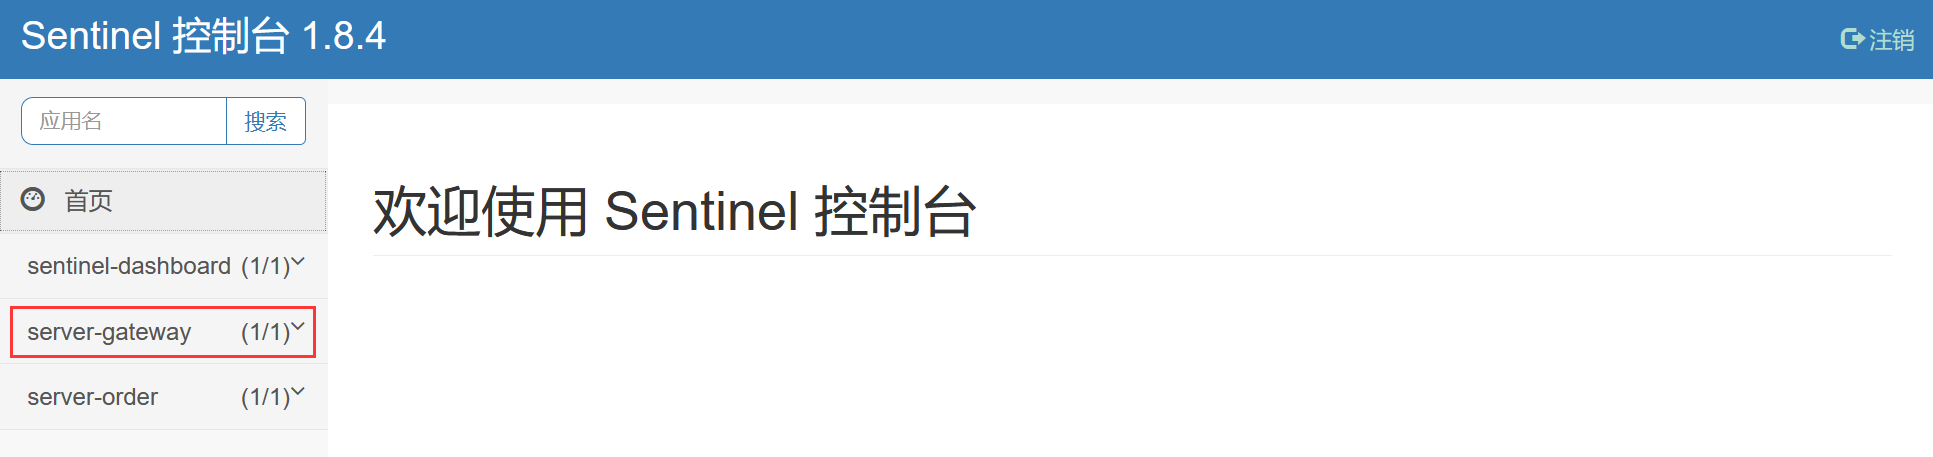
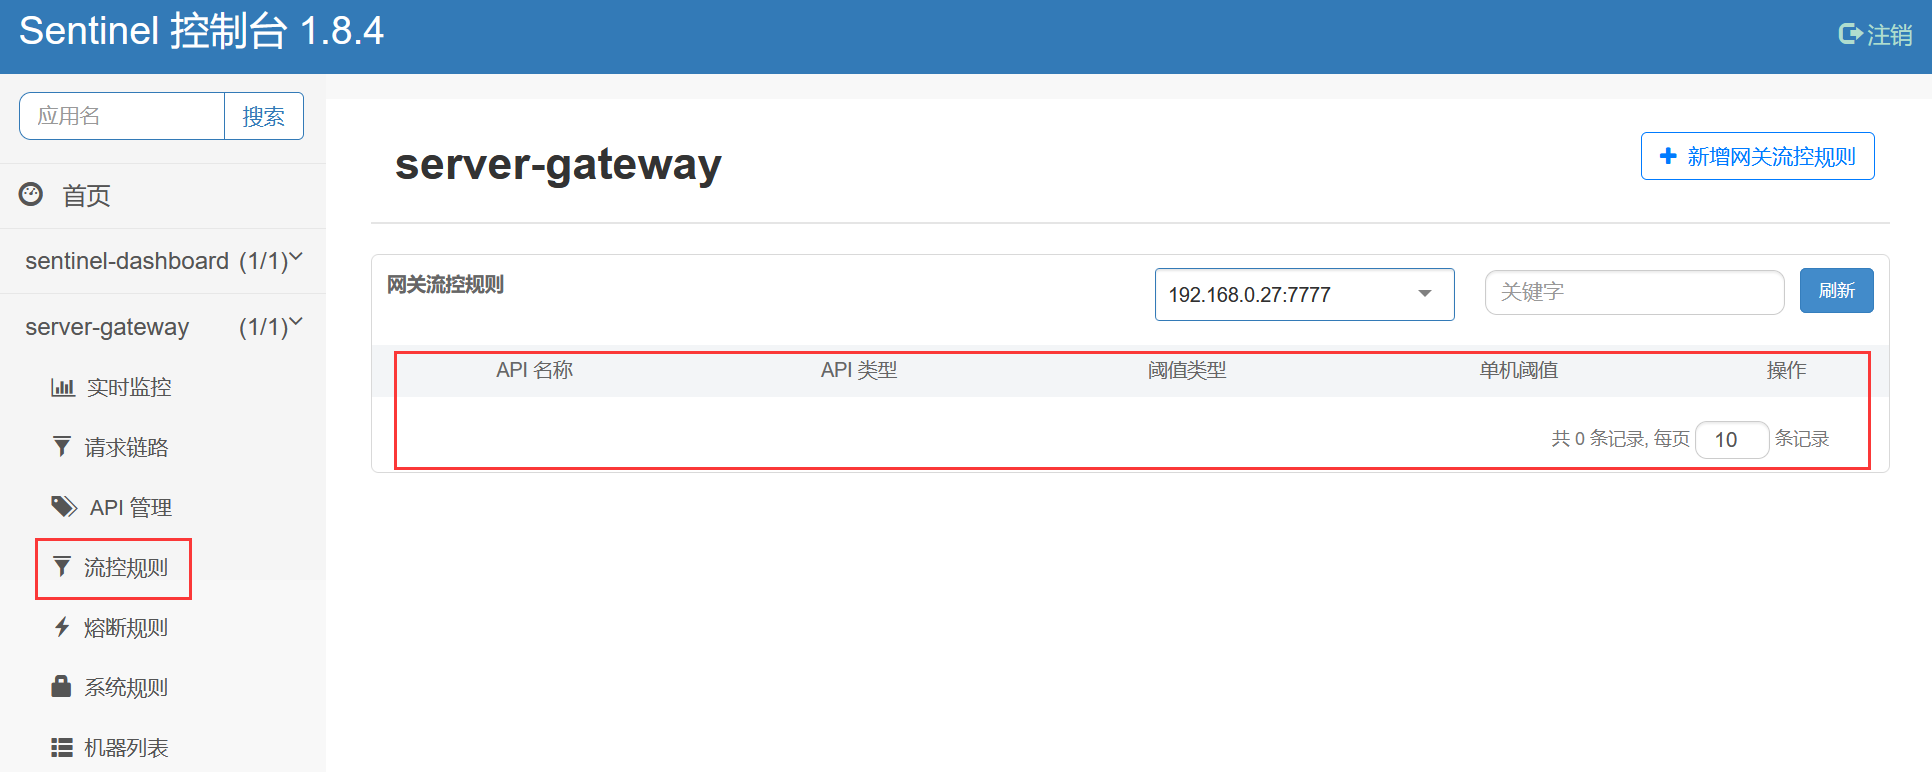
(5)分别启动用户微服务、商品微服务、订单微服务和服务网关,启动后会在Sentinel管理界面左侧菜单栏中看到server-gateway菜单,如下所示。
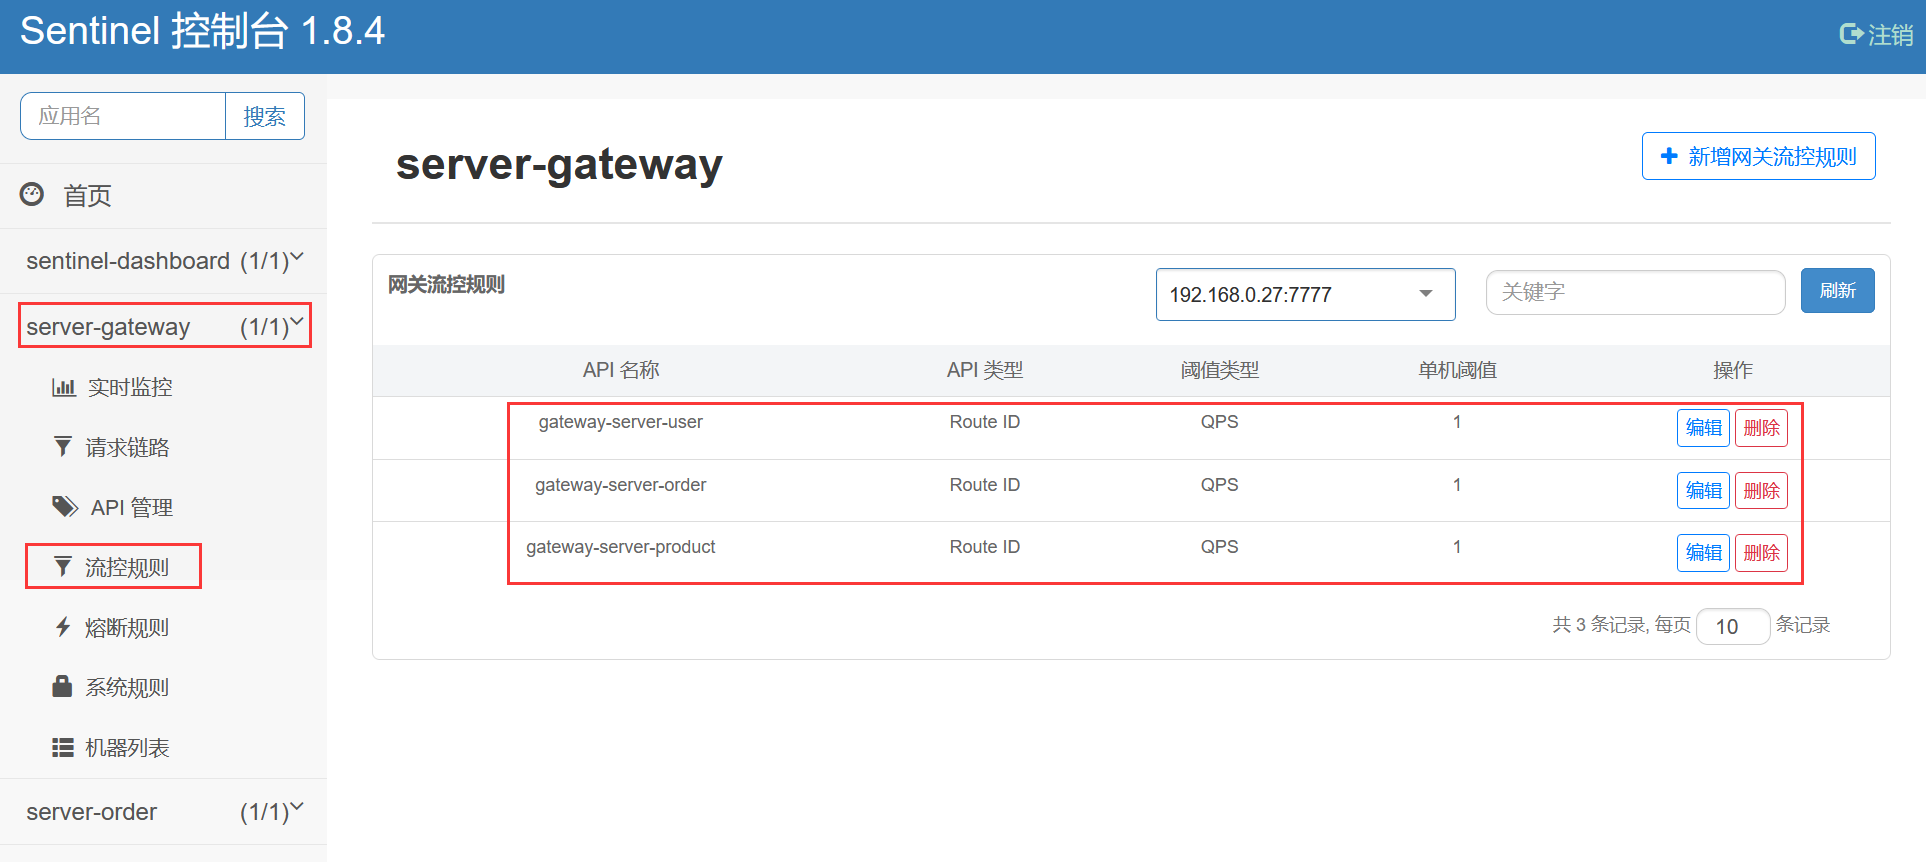
在server-gateway菜单下的流控规则子菜单中可以看到网关的流控规则已经注册到Sentinel,如下所示。
(6)通过服务网关访问用户微服务,在浏览器中输入http://localhost:10001/server-user/user/get/1001,不断刷新页面,如下所示。
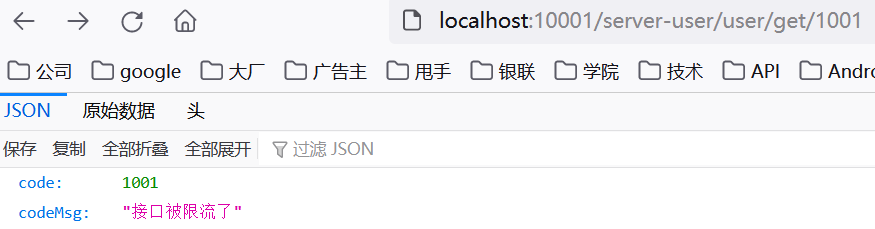
用户微服务返回的原始数据如下所示。
{
  "code": 1001,
  "codeMsg": "接口被限流了"
}
2
3
4
可以看到,通过服务网关不断刷新用户微服务时,触发了服务限流,并返回了自定义的限流结果数据。
(7)通过服务网关访问商品微服务,在浏览器中输入http://localhost:10001/server-product/product/get/1001,不断刷新页面,如下所示。
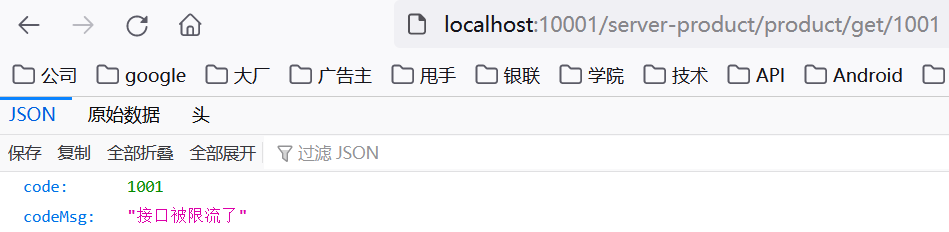
商品微服务返回的原始数据如下所示。
{
  "code": 1001,
  "codeMsg": "接口被限流了"
}
2
3
4
可以看到,通过服务网关不断刷新商品微服务时,触发了服务限流,并返回了自定义的限流结果数据。
(8)通过服务网关访问订单微服务,在浏览器中输入http://localhost:10001/server-order/order/test_sentinel,不断刷新页面,如下所示。
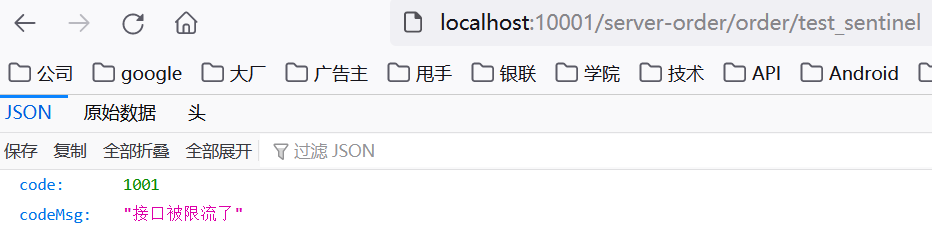
可以看到,通过服务网关不断刷新订单微服务时,触发了服务限流,并返回了自定义的限流结果数据。
# 实现自定义API分组维度限流
前面,我们实现了route维度的限流,接下来,我们再基于Sentinel与SpringCloud gateway实现自定义API分组维度的限流。
(1)在服务网关shop-gateway模块的io.binghe.shop.config.GatewayConfig配置类中新增initCustomizedApis()方法,初始化API管理的信息,源码如下所示。
private void initCustomizedApis() {
    Set<ApiDefinition> definitions = new HashSet<>();
    ApiDefinition api1 = new ApiDefinition("user_api1")
        .setPredicateItems(new HashSet<ApiPredicateItem>() {{
            // 以/server-user/user/api1 开头的请求
            add(new ApiPathPredicateItem().setPattern("/server-user/user/api1/**").
                setMatchStrategy(SentinelGatewayConstants.URL_MATCH_STRATEGY_PREFIX));
        }});
    ApiDefinition api2 = new ApiDefinition("user_api2")
        .setPredicateItems(new HashSet<ApiPredicateItem>() {{
            // 以/server-user/user/api2/demo1 完成的url路径匹配
            add(new ApiPathPredicateItem().setPattern("/server-user/user/api2/demo1"));
        }});
    definitions.add(api1);
    definitions.add(api2);
    GatewayApiDefinitionManager.loadApiDefinitions(definitions);
}
2
3
4
5
6
7
8
9
10
11
12
13
14
15
16
17
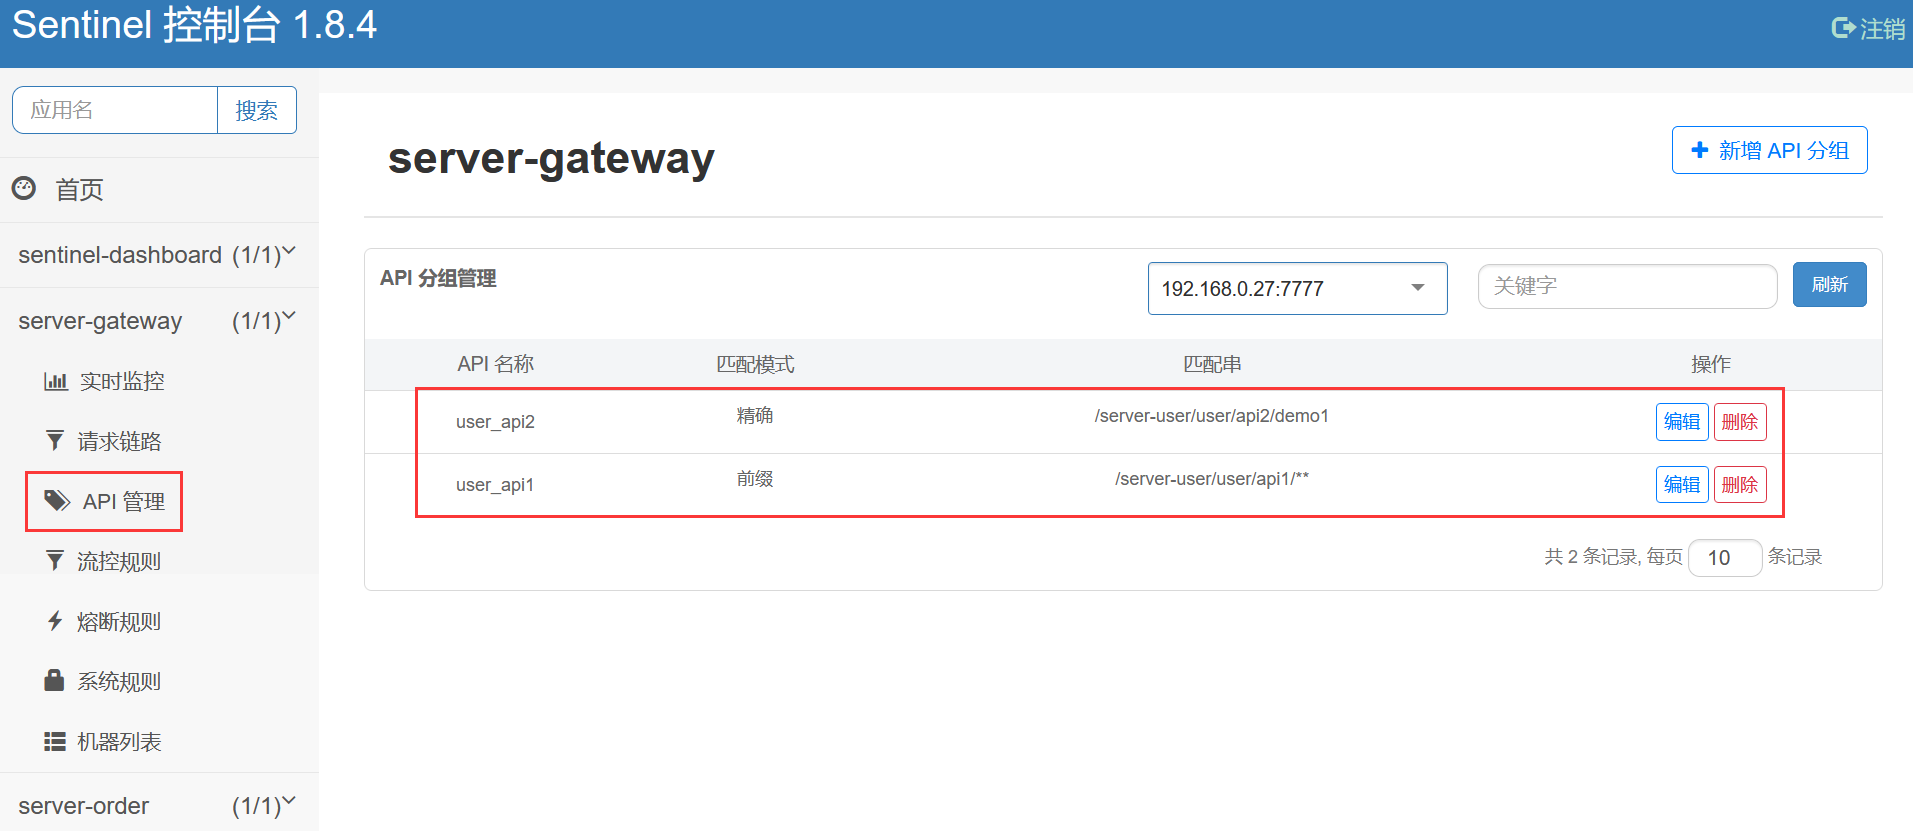
上述代码中,配置了两个API分组,每个API分组的规则如下。
- user_api1分组:匹配以
/product-serv/product/api1开头的所有请求。 - user_api2分组:精确匹配
/server-user/user/api2/demo1。
(2)在服务网关shop-gateway模块的io.binghe.shop.config.GatewayConfig配置类中init()方法中调用initCustomizedApis()方法,为了避免route维度的限流对自定义API分组维度的限流产生影响,这里,同时在init()方法中注释掉调用initGatewayRules()方法,修改后的init()方法的代码如下所示。
@PostConstruct
public void init() {
    //this.initGatewayRules();
    this.initBlockHandlers();
    this.initCustomizedApis();
}
2
3
4
5
6
(3)在用户微服务shop-user的io.binghe.shop.user.controller.UserController类中新增四个测试接口,源码如下所示。
@GetMapping(value = "/api1/demo1")
public String api1Demo1(){
    log.info("访问了api1Demo1接口");
    return "api1Demo1";
}
@GetMapping(value = "/api1/demo2")
public String api1Demo2(){
    log.info("访问了api1Demo2接口");
    return "api1Demo2";
}

@GetMapping(value = "/api2/demo1")
public String api2Demo1(){
    log.info("访问了api2Demo1接口");
    return "api2Demo1";
}
@GetMapping(value = "/api2/demo2")
public String api2Demo2(){
    log.info("访问了api2Demo2接口");
    return "api2Demo2";
}
2
3
4
5
6
7
8
9
10
11
12
13
14
15
16
17
18
19
20
21
(4)分别启动用户微服务、商品微服务、订单微服务和服务网关,启动后会在Sentinel管理界面左侧菜单栏中看到server-gateway菜单,如下所示。
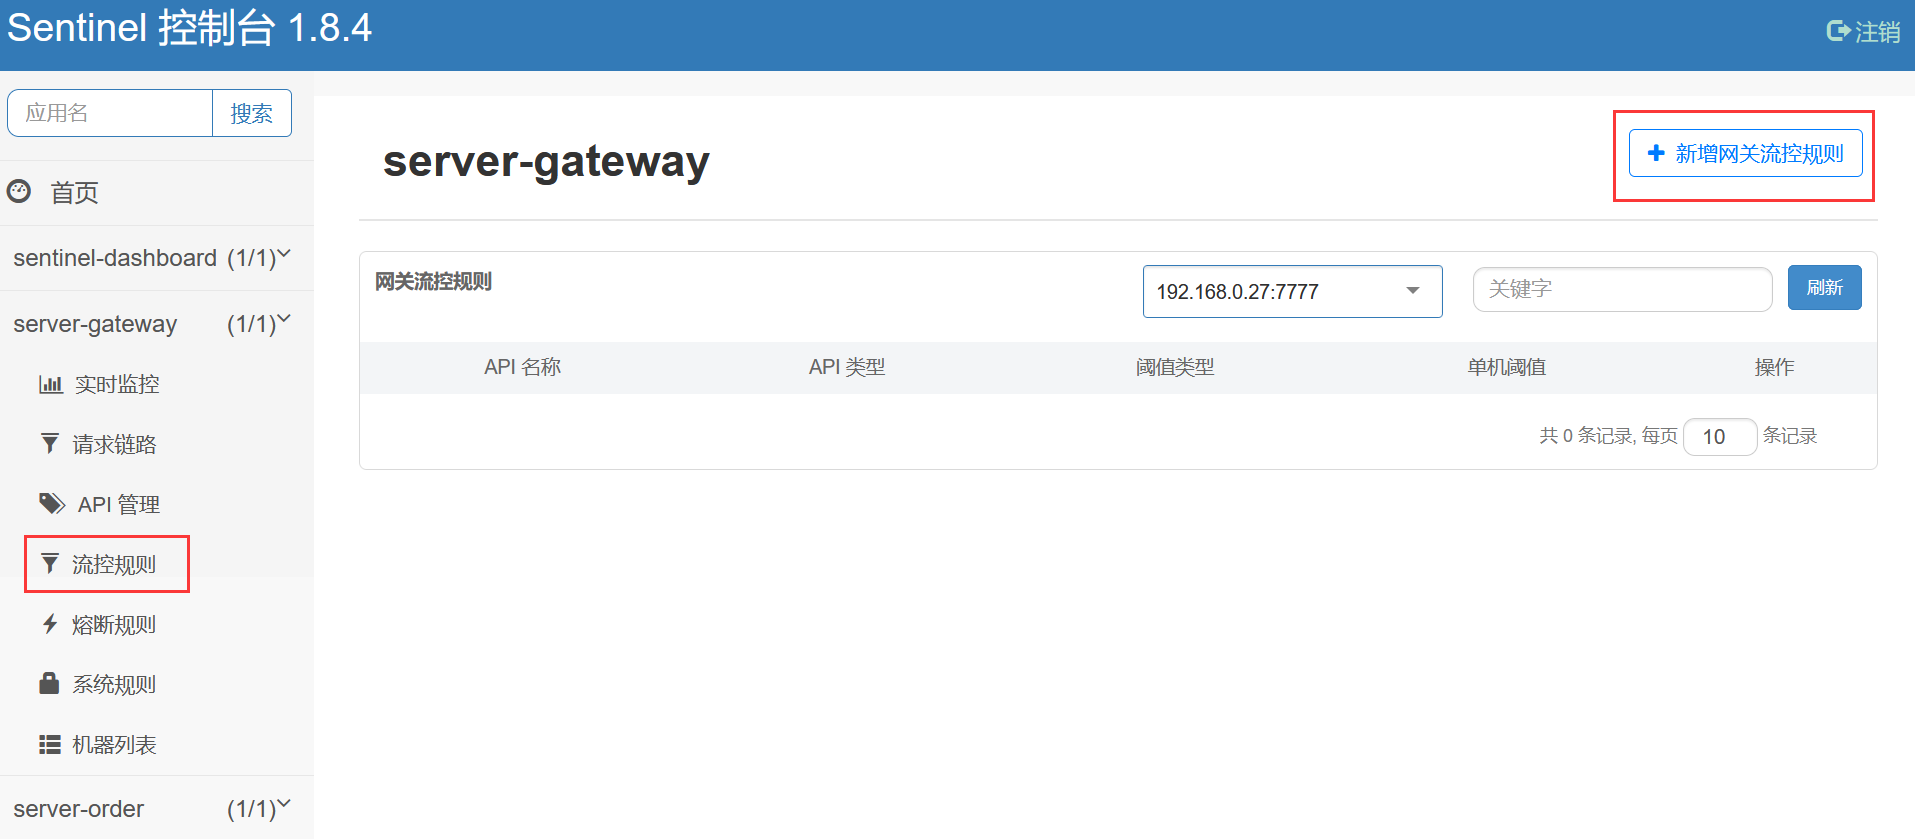
此时,由于我们注释了调用以route维度限流的方法,所以,在流控规则里的限流规则为空,如下所示。
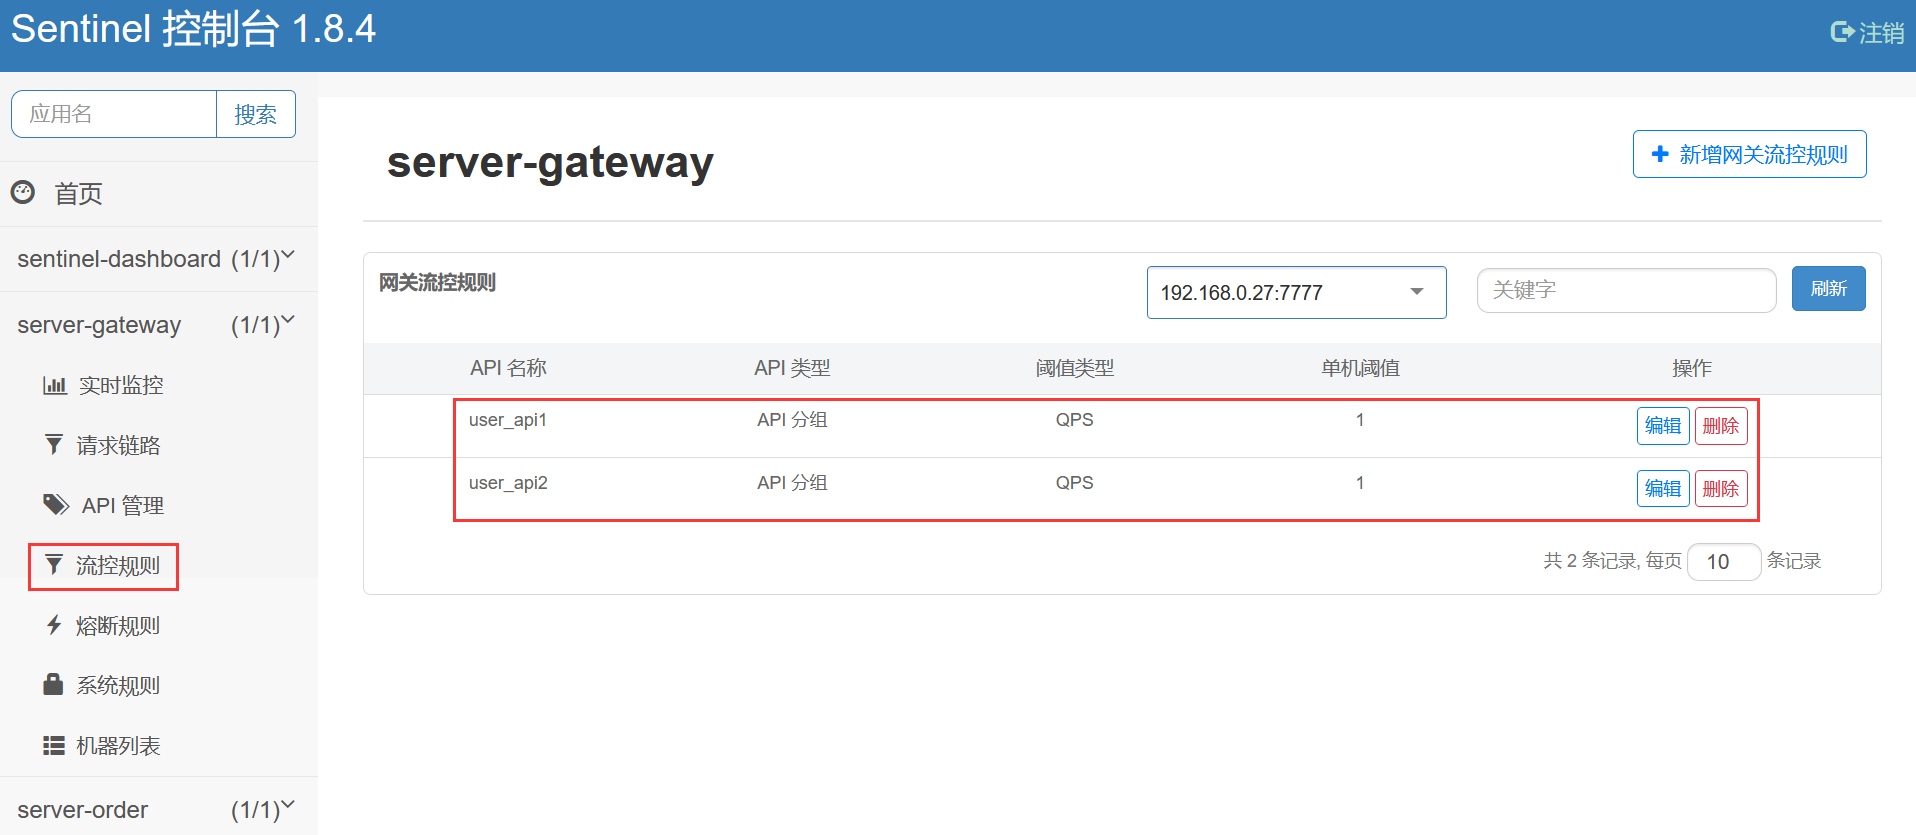
在API管理里面会发现我们定义的API分组已经自动注册到Sentinel中了,如下所示。
(5)在Sentinel管理界面的流控规则中,新增网关流控规则,如下所示。
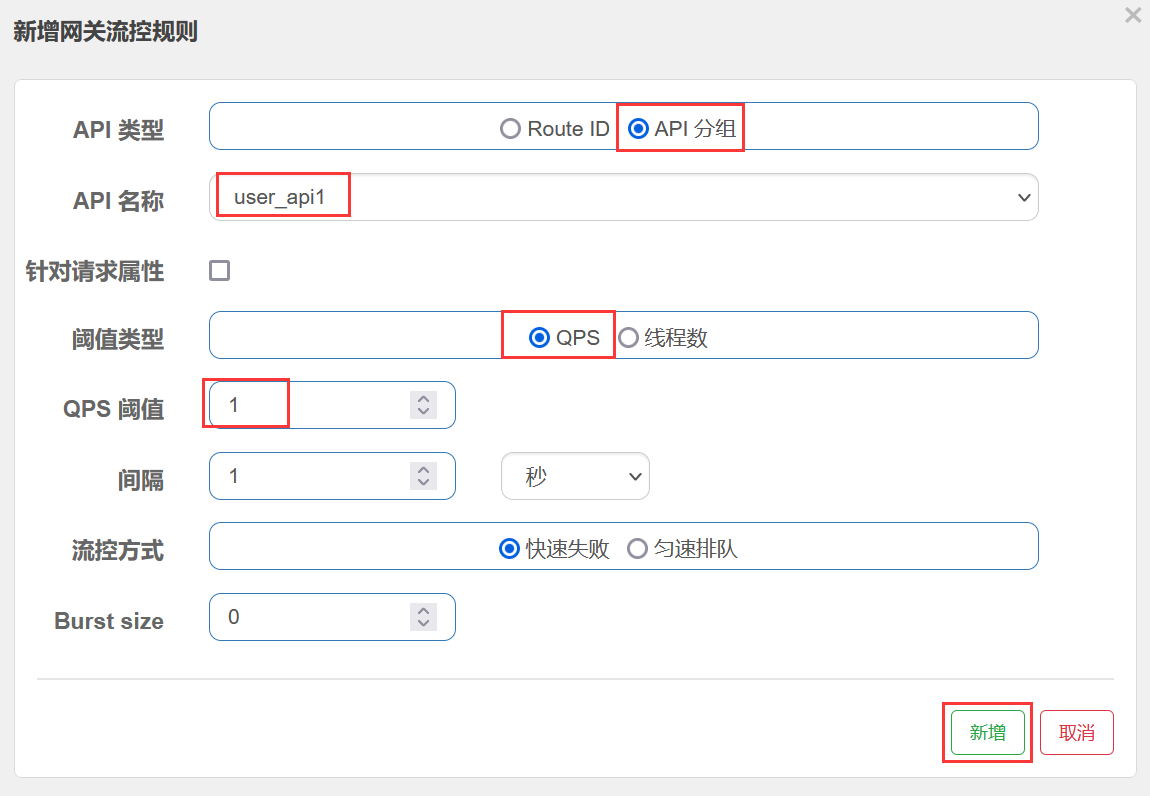
点击新增网关流控规则后,会弹出新增网关流控规则配置框,按照如下方式为user_api1分组配置限流规则。
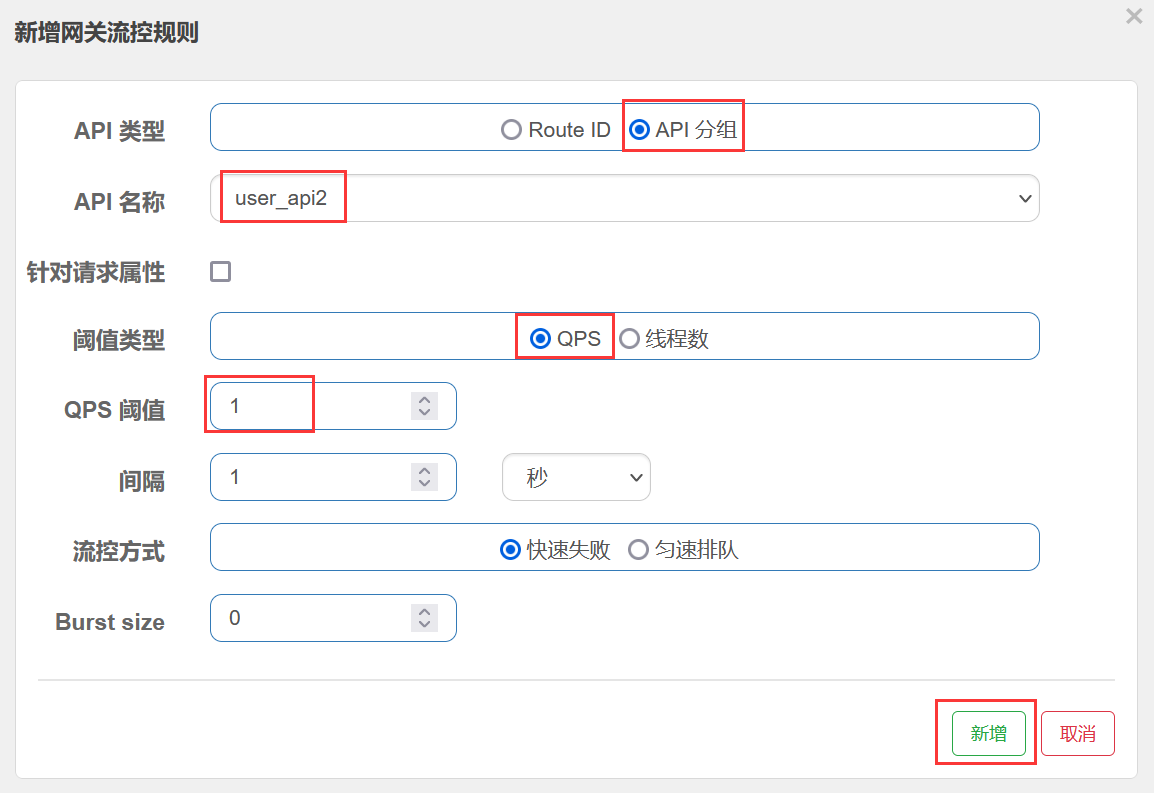
点击新增按钮后,按照同样的方式为user_api2分组配置限流规则。
配置完毕后,在流控规则中的限流规则如下所示。
(6)预期的测试结果如下。
- 当频繁访问
http://localhost:10001/server-user/user/api1/demo1时会被限流。 - 当频繁访问
http://localhost:10001/server-user/user/api1/demo2时会被限流。 - 当频繁访问
http://localhost:10001/server-user/user/api2/demo1时会被限流。 - 当频繁访问
http://localhost:10001/server-user/user/api2/demo2时不会被限流。
注意:只有最后一个不会被限流。
(7)在浏览器上频繁访问http://localhost:10001/server-user/user/api1/demo1,如下所示。
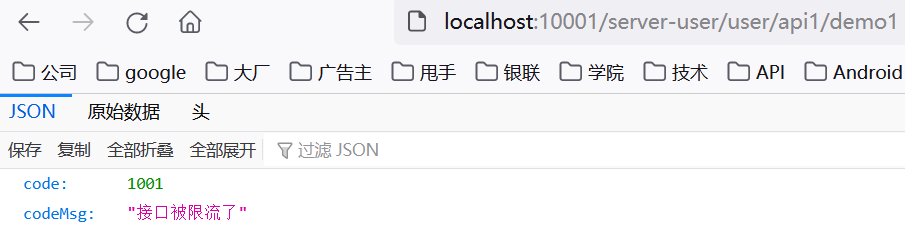
返回的原始数据如下所示。
{
  "code": 1001,
  "codeMsg": "接口被限流了"
}
2
3
4
说明触发了服务限流,并返回了自定义的限流结果数据。
(8)在浏览器上频繁访问http://localhost:10001/server-user/user/api1/demo2,如下所示。
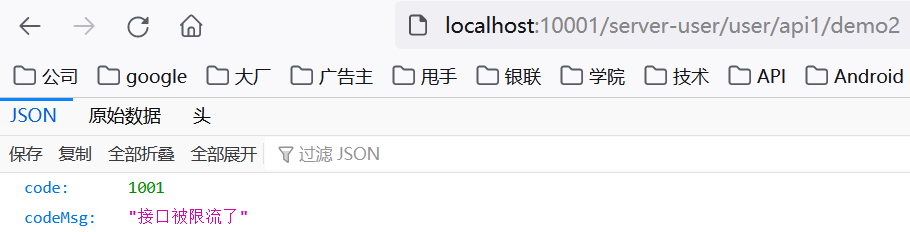
返回的原始数据如下所示。
{
  "code": 1001,
  "codeMsg": "接口被限流了"
}
2
3
4
说明触发了服务限流,并返回了自定义的限流结果数据。
(9)在浏览器上频繁访问http://localhost:10001/server-user/user/api2/demo1,如下所示。
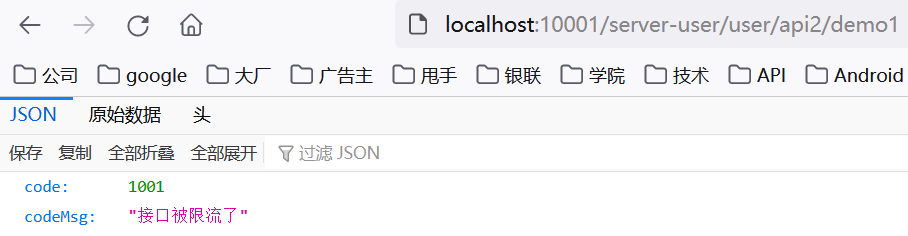
返回的原始数据如下所示。
{
  "code": 1001,
  "codeMsg": "接口被限流了"
}
2
3
4
说明触发了服务限流,并返回了自定义的限流结果数据。
(10)在浏览器上频繁访问http://localhost:10001/server-user/user/api2/demo2,如下所示。

可以看到,访问http://localhost:10001/server-user/user/api2/demo2时,无论访问的频率多频繁,都不会触发Sentinel限流。
至此,我们就成功在项目中整合了SpringCloud Gateway网关,并通过Sentinel整合SpringCloud Gateway实现了网关的限流操作。
好了,今天我们就到儿吧,限于篇幅,文中并未给出完整的案例源代码,想要完整源代码的小伙伴可加入【冰河技术】知识星球获取源码。也可以加我微信:hacker_binghe,一起交流技术。
另外,一不小心就写了13章了,小伙伴们你们再不上车就跟不上了!!!
# 星球服务
加入星球,你将获得:
1.项目学习:微服务入门必备的SpringCloud Alibaba实战项目、手写RPC项目—所有大厂都需要的项目【含上百个经典面试题】、深度解析Spring6核心技术—只要学习Java就必须深度掌握的框架【含数十个经典思考题】、Seckill秒杀系统项目—进大厂必备高并发、高性能和高可用技能。
2.框架源码:手写RPC项目—所有大厂都需要的项目【含上百个经典面试题】、深度解析Spring6核心技术—只要学习Java就必须深度掌握的框架【含数十个经典思考题】。
3.硬核技术:深入理解高并发系列(全册)、深入理解JVM系列(全册)、深入浅出Java设计模式(全册)、MySQL核心知识(全册)。
4.技术小册:深入理解高并发编程(第1版)、深入理解高并发编程(第2版)、从零开始手写RPC框架、SpringCloud Alibaba实战、冰河的渗透实战笔记、MySQL核心知识手册、Spring IOC核心技术、Nginx核心技术、面经手册等。
5.技术与就业指导:提供相关就业辅导和未来发展指引,冰河从初级程序员不断沉淀,成长,突破,一路成长为互联网资深技术专家,相信我的经历和经验对你有所帮助。
冰河的知识星球是一个简单、干净、纯粹交流技术的星球,不吹水,目前加入享5折优惠,价值远超门票。加入星球的用户,记得添加冰河微信:hacker_binghe,冰河拉你进星球专属VIP交流群。
# 星球重磅福利
跟冰河一起从根本上提升自己的技术能力,架构思维和设计思路,以及突破自身职场瓶颈,冰河特推出重大优惠活动,扫码领券进行星球,直接立减149元,相当于5折, 这已经是星球最大优惠力度!

领券加入星球,跟冰河一起学习《SpringCloud Alibaba实战》、《手撸RPC专栏》和《Spring6核心技术》,更有已经上新的《大规模分布式Seckill秒杀系统》,从零开始介绍原理、设计架构、手撸代码。后续更有硬核中间件项目和业务项目,而这些都是你升职加薪必备的基础技能。
100多元就能学这么多硬核技术、中间件项目和大厂秒杀系统,如果是我,我会买他个终身会员!
# 其他方式加入星球
- 链接 :打开链接 http://m6z.cn/6aeFbs (opens new window) 加入星球。
- 回复 :在公众号 冰河技术 回复 星球 领取优惠券加入星球。
特别提醒: 苹果用户进圈或续费,请加微信 hacker_binghe 扫二维码,或者去公众号 冰河技术 回复 星球 扫二维码加入星球。
# 星球规划
后续冰河还会在星球更新大规模中间件项目和深度剖析核心技术的专栏,目前已经规划的专栏如下所示。
# 中间件项目
- 《大规模分布式定时调度中间件项目实战(非Demo)》:全程手撸代码。
- 《大规模分布式IM(即时通讯)项目实战(非Demo)》:全程手撸代码。
- 《大规模分布式网关项目实战(非Demo)》:全程手撸代码。
- 《手写Redis》:全程手撸代码。
- 《手写JVM》全程手撸代码。
# 超硬核项目
- 《从零落地秒杀系统项目》:全程手撸代码,在阿里云实现压测(已上新)。
- 《大规模电商系统商品详情页项目》:全程手撸代码,在阿里云实现压测。
- 其他待规划的实战项目,小伙伴们也可以提一些自己想学的,想一起手撸的实战项目。。。
既然星球规划了这么多内容,那么肯定就会有小伙伴们提出疑问:这么多内容,能更新完吗?我的回答就是:一个个攻破呗,咱这星球干就干真实中间件项目,剖析硬核技术和项目,不做Demo。初衷就是能够让小伙伴们学到真正的核心技术,不再只是简单的做CRUD开发。所以,每个专栏都会是硬核内容,像《SpringCloud Alibaba实战》、《手撸RPC专栏》和《Spring6核心技术》就是很好的示例。后续的专栏只会比这些更加硬核,杜绝Demo开发。
小伙伴们跟着冰河认真学习,多动手,多思考,多分析,多总结,有问题及时在星球提问,相信在技术层面,都会有所提高。将学到的知识和技术及时运用到实际的工作当中,学以致用。星球中不少小伙伴都成为了公司的核心技术骨干,实现了升职加薪的目标。
# 联系冰河
# 加群交流
本群的宗旨是给大家提供一个良好的技术学习交流平台,所以杜绝一切广告!由于微信群人满 100 之后无法加入,请扫描下方二维码先添加作者 “冰河” 微信(hacker_binghe),备注:星球编号。

# 公众号
分享各种编程语言、开发技术、分布式与微服务架构、分布式数据库、分布式事务、云原生、大数据与云计算技术和渗透技术。另外,还会分享各种面试题和面试技巧。内容在 冰河技术 微信公众号首发,强烈建议大家关注。

# 视频号
定期分享各种编程语言、开发技术、分布式与微服务架构、分布式数据库、分布式事务、云原生、大数据与云计算技术和渗透技术。另外,还会分享各种面试题和面试技巧。

# 星球
加入星球 冰河技术 (opens new window),可以获得本站点所有学习内容的指导与帮助。如果你遇到不能独立解决的问题,也可以添加冰河的微信:hacker_binghe, 我们一起沟通交流。另外,在星球中不只能学到实用的硬核技术,还能学习实战项目!
关注 冰河技术 (opens new window)公众号,回复 星球 可以获取入场优惠券。